Registro del conector
Introducción
Todos los conectores utilizados en Harmony deben estar registrados y los desarrolladores que utilizan Harmony Connector SDK necesita registrar sus conectores antes de construirlos y empaquetarlos.
Cada conector y cada una de sus actividades recibe una identificación única de Jitterbit que lo identifica de todos los demás conectores y sus actividades.
Antes de crear un archivo JAR de conector, deberá obtener de Harmony estos valores para cada conector:
- Identificación del conector
- Llave de conector
- Secreto del conector
- ID de entidad de Extremo
- ID de actividad inicial
- ID de actividad final
API REST para registrar conectores
Para obtener estos valores, utilice el Jitterbit Connector Manager API, disponible como una colección de Postman incluida en el Conector de Dropbox en postman/JitterbitConnectorManagerAPI.collection.json.
La colección proporciona estas funciones ("solicitudes"):
- Usuario de inicio de sesión
- Registrar un conector
- Lista de conectores registrados
- Eliminar un conector de registro
- Validar clave/secreto del conector
Configurando la API en Postman
Antes de ejecutar la API REST, importe las variables de ambiente desde
postman/JitterbitConnectorManagerAPIEnvVariables.json en Postman y asociarlos con la colección.
Edite el ambiente de Postman e ingrese valores para las claves host (tal como lo define su región; consulte Encontrar mi región), email (tu Harmony Jitterbit nombre de usuario), password (su contraseña de Harmony ), Harmony orgID, y el conector name, version, y description. Las otras variables de ambiente (authToken, connectorID, key, y secret) será ingresado por Cartero mientras usa las APIs:
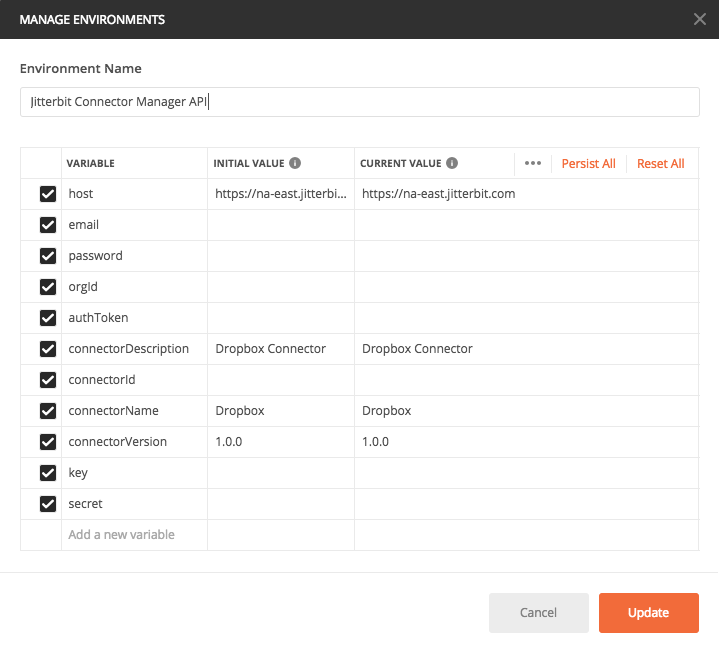
El nombre con el que está registrado el conector debe coincidir con el valor del adapter.json archivo utilizado para describir la interfaz de usuario. (Para obtener detalles sobre la interfaz de usuario de Integration Studio y el adapter.json archivo, consulte Despliegue del conector y Componentes de la interfaz de usuario del SDK del conector.)
Al comienzo de una sesión de ejecución de las funciones API, siempre ejecute primero el Log In User función para obtener una authenticationToken. Postman conservará este token y lo utilizará para solicitudes posteriores en la misma sesión.
Registro de un conector
Para registrar un conector, ejecute estas dos APIs en orden con Postman:
-
Log In User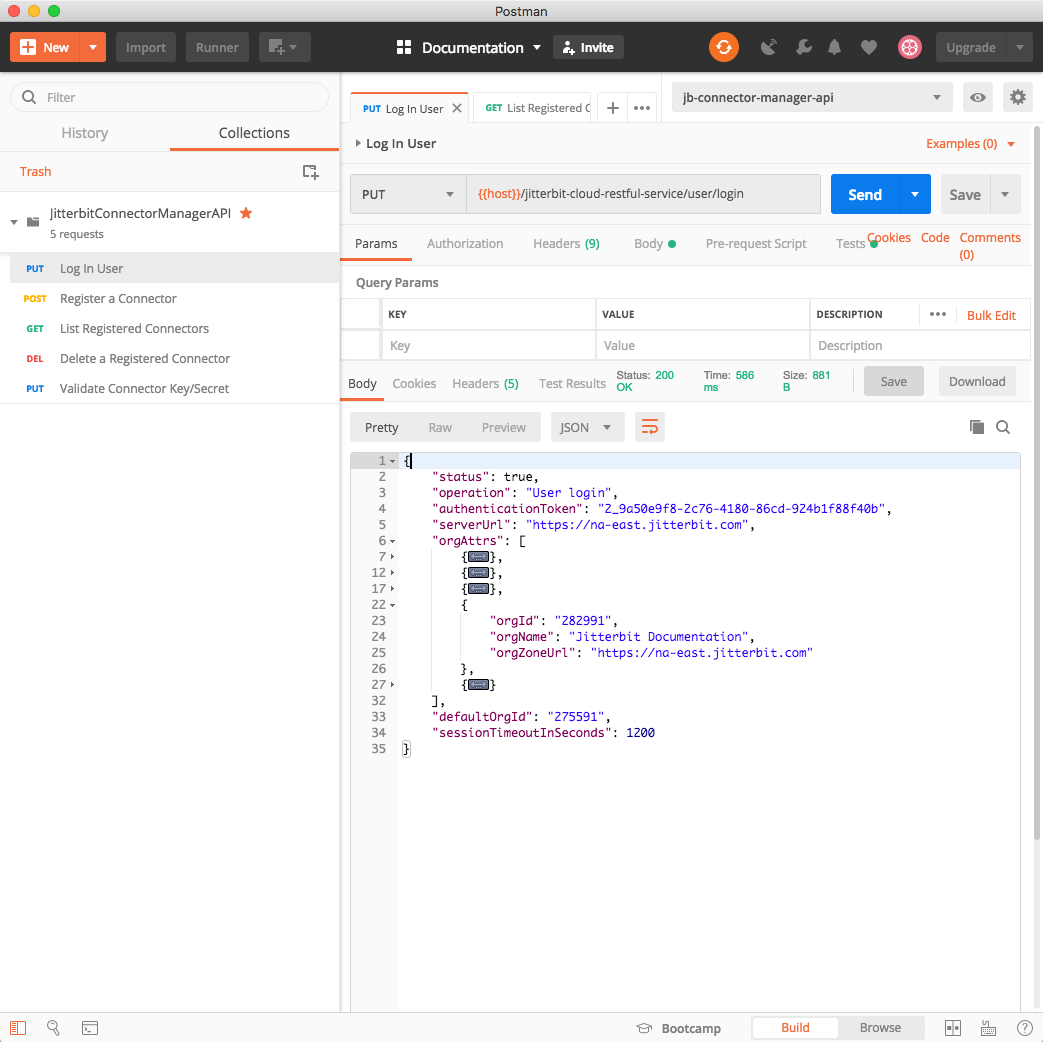
-
Register a Connector
La respuesta devuelta por el Register a Connector La API contiene los valores-clave que se necesitan para el conector manifiesto para completar el registro del conector. Deberías recibir una respuesta como:
{
  "status": true,
  "operation": "Register a connector",
  "id": "3691",
  "key": "41384368...d871d2d7ec9",
  "secret": "bb574709...7f2f79f60c49",
  "endpointEntityId": "20101",
  "functionEntityStartId": "20102",
  "functionEntityEndId": "20200"
}
Como se puede ver en este ejemplo, un conector ha sido registrado, tiene una ID de 3691, tiene un ID de entidad de extremo de 20101 y puede tener ID de entidad de actividad de función que van desde 20102 a través de 20200. Una clave y un secreto tienen también ha sido devuelto.
| Registrar Conector API | Claves de archivo de manifiesto |
|---|---|
key | Jitterbit-Connector-Key |
secret | Jitterbit-Connector-Secret |
endpointEntityId | Jitterbit-Connector-Endpoint-EntityTypeId |
functionEntityStartId | Jitterbit-Activity-EntityTypeId-<first_activity> |
functionEntityEndId | Jitterbit-Activity-EntityTypeId-<last_activity> |
La clave y el secreto devuelto se convertirán, como se muestra en la tabla anterior, en el Jitterbit-Connector-Key y Jitterbit-Connector-Secret en el manifiesto del contenedor.
Al conector se le ha asignado un Id. de extremo y un rango de Id. de extremo de actividad (función), del primero al el último. En el caso del conector de Dropbox, que tiene cuatro actividades (Obtener archivo, Obtener archivo, Procesar archivo y Put File), asignaría ID individuales a cada actividad de modo que se encuentren dentro del rango asignado. A se puede asignar un máximo de 99 actividades a un conector individual.
Los conectores se pueden registrar en cualquier punto del proceso de desarrollo (ya sea mientras está formulando su diseño o justo antes del envasado). Sin embargo, es una buena práctica hacerlo lo antes posible, en caso de que haya problemas en su registro o en la obtención de las claves necesarias.
Listado de conectores registrados
Utilice este método para ver todos los conectores actualmente registrados en una organización. utiliza el host y orgId variables del ambiente de Postman.
Desde Postman, ejecute estas dos APIs en orden:
-
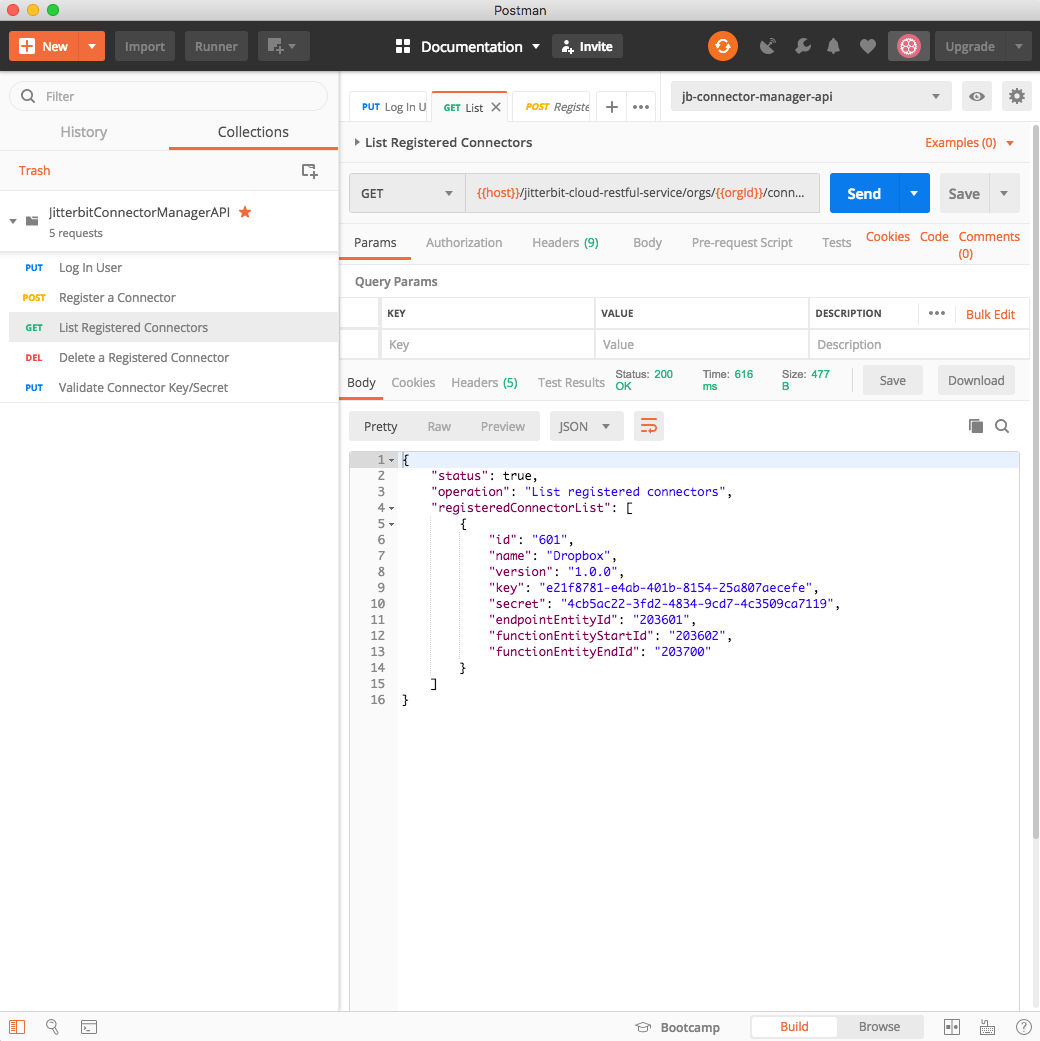
Log In User(obligatorio solo si aún no lo ha ejecutado en la sesión actual; consulte Registro de un conector) -
List Registered ConnectorsEsta captura de pantalla muestra la lista de conectores registrados devueltos para la organización actual:
Eliminación de un conector registrado
Si es necesario, puede eliminar un conector registrado. Para eliminar un conector, es necesario que tenga tanto la organización (orgId) al que pertenece y el ID del conector (connectorId). El ID del conector se mostró cuando el conector se registró y se puede encontrar usando la Lista de conectores registrados método para ver todos los conectores registrados actualmente en una organización.
Desde Postman, ejecute estas dos APIs en orden:
-
Log In User(obligatorio solo si aún no lo ha ejecutado en la sesión actual; consulte Registro de un conector) -
Delete a Registered ConnectorEsta captura de pantalla muestra el mensaje devuelto si el conector especificado por el
connectorIdfue exitoso eliminado: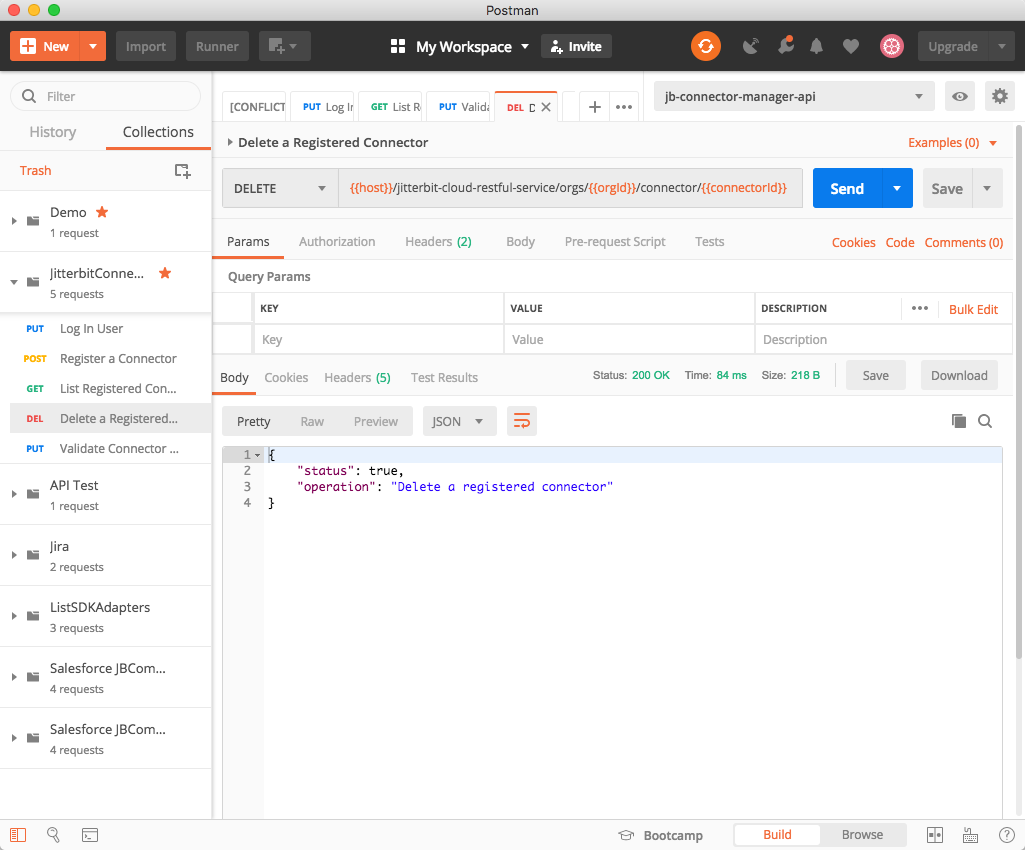
Validación de una clave/secreto de conector
Puede validar el nombre, la clave y el secreto de un conector registrado. Introduzca los valores en el connectorName, key, y secret Variables de ambiente de Postman, y luego use esta API. Tenga en cuenta que los tres elementos son obligatorios, incluido el nombre del conector, para validar la clave y el secreto del conector.
Estos valores se mostraron cuando se registró el conector y se pueden encontrar utilizando el Lista de conectores registrados método para ver todos los conectores actualmente registrados en una organización.
Desde Postman, ejecute estas dos APIs en orden:
-
Log In User(obligatorio solo si aún no lo ha ejecutado en la sesión actual; consulte Registro de un conector) -
Validate Connector Key/SecretEsta captura de pantalla muestra el mensaje devuelto si el conector especificado por el
connectorIdfue exitoso validado (la clave y el secreto son correctos para el conector mencionado):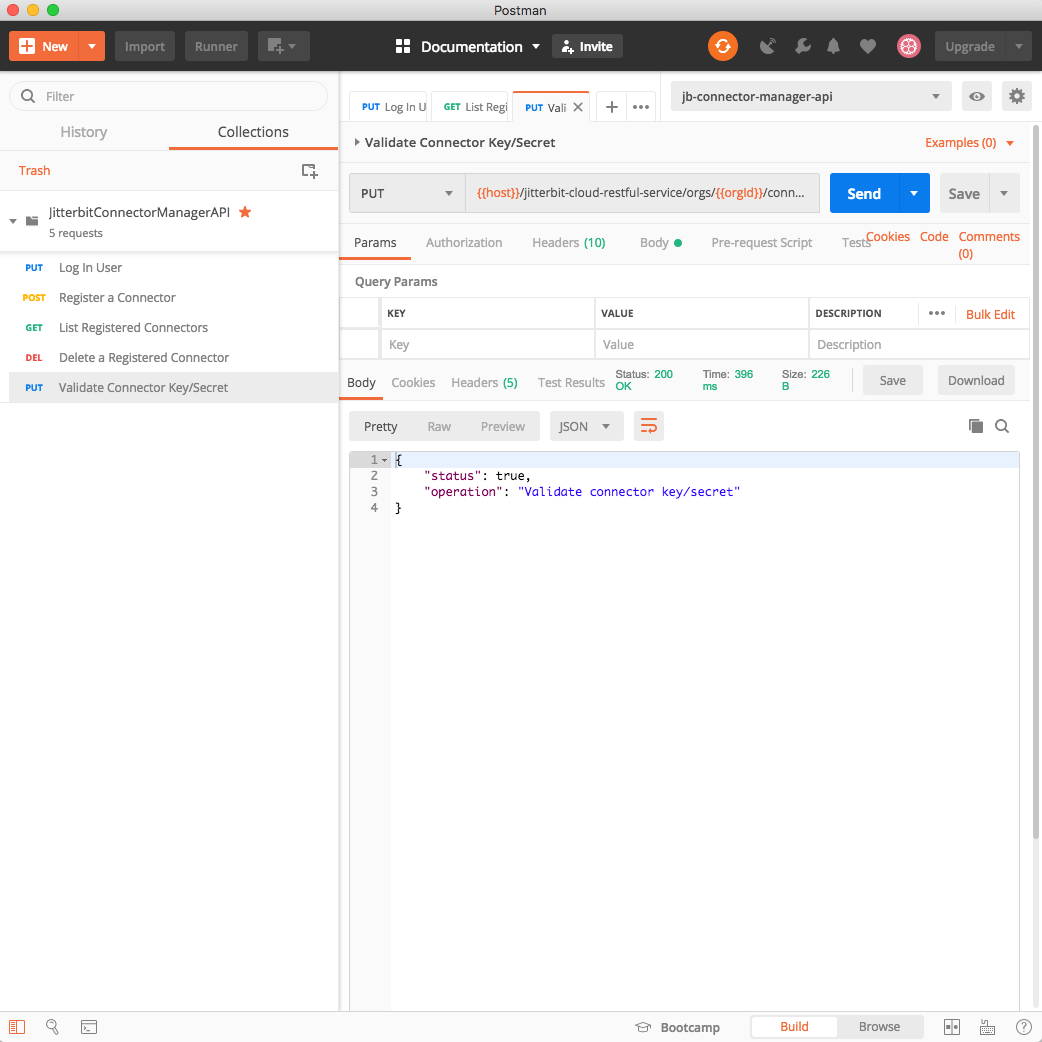
Manifiesto del conector
Como parte de la compilación de Maven, estos atributos deben estar presentes como parte de la MANIFEST.MF para indicar que es un Conector de Harmony Jitterbit. Uso del manifiesto del conector de Dropbox, con sus actividades: Obtener archivo, Colocar Archivo, Procesar archivo y Obtener archivo, y los valores para endpointEntityId, functionEntityStartID y functionEntityEndID como se muestra arriba, podría construir un manifiesto como:
Author: <author_name>
Version: 1.0.0
Jitterbit-Connector-Key: XXXXXXXX-XXXX-XXXX-XXXX-XXXXXXXXXXXX
Jitterbit-Connector-Secret: XXXXXXXX-XXXX-XXXX-XXXX-XXXXXXXXXXXX
Jitterbit-Connector-Endpoint-Id: 20101
Jitterbit-Connector-UI: adapter.json
Jitterbit-Activity-EntityTypeId-fetch: 20102
Jitterbit-Activity-EntityTypeId-put: 20103
Jitterbit-Activity-EntityTypeId-process: 20104
Jitterbit-Activity-EntityTypeId-get: 20105
Jitterbit-ConnectorClassLoader-Version: 1.0.0
Class-Path: lib/dropbox-core-sdk-3.0.6.jar
| Clave de archivo de manifiesto | Descripción |
|---|---|
Author | Reemplazar <author_name> con tu nombre. |
Version | Establezca el identificador de versión semántica apropiado (por ejemplo, versión 1.0.0). |
Jitterbit-Connector-* | Consulte la sección anterior sobre API REST para registrar conectores para obtener detalles sobre cómo obtener estos atributos mediante una API REST. |
Jitterbit-Activity-* | Consulte la sección anterior sobre API REST para registrar conectores para obtener detalles sobre cómo obtener estos atributos mediante una API REST. |
Jitterbit-Connector-UI | (Opcional) Proporciona el archivo que contiene las declaraciones de IU para el conector. El nombre predeterminado es adapter.json. |
Jitterbit-Connector-Factory-Class | (Opcional) Proporciona la clase de fábrica que crea una instancia de JitterbitConnector. Si no se proporciona entonces debe usar un @Connector anotación en la clase de entrada que implementa el JitterbitConnector interfaz o extiende la clase abstracta BaseJitterbitConnector. |
Jitterbit-ConnectorClassLoader-Version | (Opcional) La versión actual es 1.0.0. La especificación de este cargador de clases evita colisiones al cargar archivos Java. Disponible con las versiones de agente 10.68 y posteriores. |
Class-Path | Una lista de URLs separadas por espacios de cualquier JAR de externo que componen el conector. En el ejemplo anterior, contiene Dropbox SDK JAR de Dropbox. |
En este ejemplo de la sección anterior, el ID del extremo del conector era 20101, el ID de actividad inicial era 20102y el ID de actividad final era 20200. A continuación, se puede asignar la actividad Obtener archivo 20102, el Archivo Poner se puede asignar una actividad 20103, la actividad Procesar archivo se puede asignar 20104 y la actividad Obtener archivo puede ser asignado 20105. Las actividades adicionales pueden, si es necesario, ser registradas y asignadas identificaciones siempre y cuando caigan dentro del rango asignado.
Cambio de un conector registrado
Si realiza cambios en un conector registrado, y especialmente en uno que se implementó en producción, tenga en cuenta cómo los cambios pueden afectar y afectarán los proyectos existentes que usan ese conector.
Cuando se implementa un conector en Harmony, los ID especificados en el MANIFEST.MF se revisan para garantizar que todas las instancias del conector en diferentes regiones sean coherentes.
En general, siga estas prácticas para asignar actividades en el MANIFEST.MF:
- Siempre asigne las actividades en orden e incremente cada actividad en 1. No deje espacios en blanco.
- Si sabe que agregará una actividad más adelante, es mejor agregarla antes y eliminar el código en los archivos de Java sin operaciones. Estos se pueden completar cuando estén listos.
- Las actividades se pueden ocultar al no incluirlas en el
adapter.jsonarchivo. - Una vez asignado y desplegado, no cambie el orden de las actividades como se indica en el
MANIFEST.MF. - Agregue cualquier actividad nueva después de la última actividad, en la siguiente posición disponible.
- No elimine una actividad existente de la
MANIFEST.MF. En su lugar, elimine la actividad deadapter.json, y extraiga su código en los archivos Java para que no tenga operaciones.
Eliminar una actividad existente que se encuentra en el medio de una lista de actividades puede provocar que los ID de las otras actividades cambien y Update actividad convirtiéndose en Create actividad en proyectos existentes.