Dropbox connector tutorial
Introduction
This tutorial covers the Dropbox connector, a complete connector built with the Jitterbit Connector SDK. Though it is fully functioning, this connector is not intended for production use. It is intended as a starting point for connector development, as it does not have all of the tests and error handling that would be expected in a production connector.
Provided that you have met the prerequisites, you can download the example, build and package it, install it on a Jitterbit private agent, and use it in a project to connect to Dropbox and move files.
The tutorial assumes that you are familiar with both Jitterbit and Jitterbit Integration Studio. If you are not familiar with Integration Studio, please review our Integration Studio documentation, in particular the Integration Studio quick start guide.
Obtain the example Dropbox connector
If you haven't already, the first step is to clone the Dropbox connector from the GitHub repository. You can do that from the GitHub website or by running these commands:
git clone https://github.com/jitterbit/dropbox-connector.git
cd dropbox-connector
Register your example Dropbox connector
You will need certain information before you can build and package the connector: a Dropbox login and application, a Harmony account username and password, and values from Jitterbit connector registration. Values obtained from connector registration are used in the manifest prior to building and packaging the connector.
Dropbox
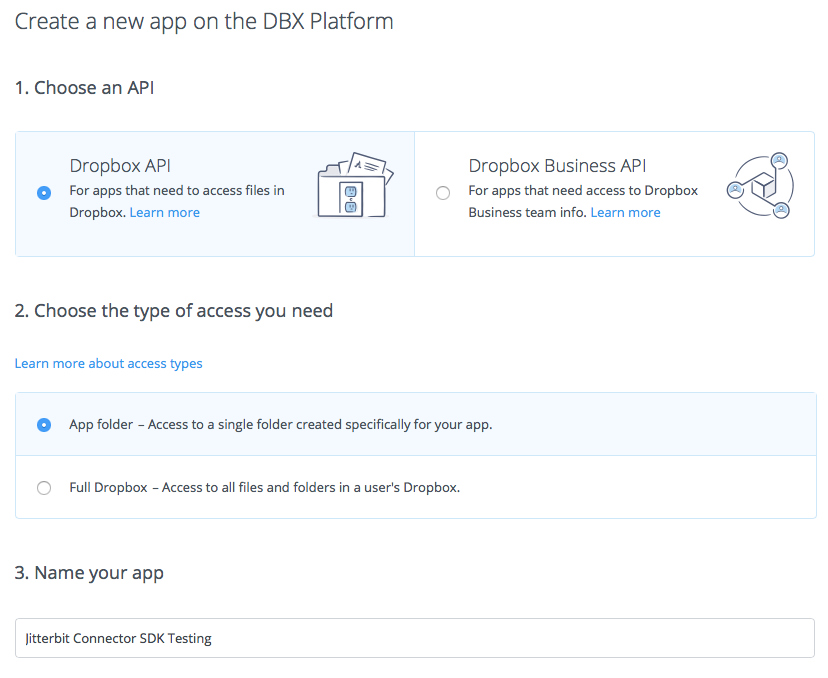
The first step is at Dropbox itself. As the connector will be an application that interfaces with Dropbox, you will need to register at Dropbox as a developer and create a Dropbox application using the Dropbox API. The application can have any name and settings. This can be done with a free Dropbox account. At the Dropbox website, create an app:
From your new application's web page, obtain its app key and generate an access token. This image shows (outlined in red) where these can be obtained on the web page:
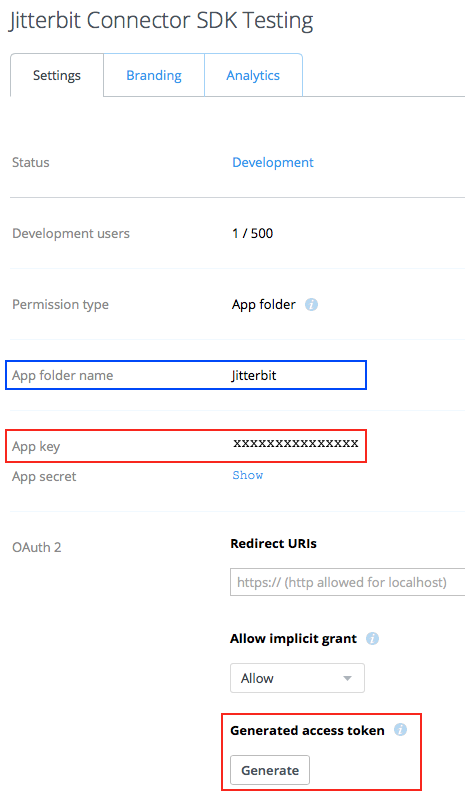
In this example, an application called "Jitterbit Connector SDK Testing" has been created. The app key is shown as "xxxxxxxxxxxxxxx". The access token will be displayed once the button Generate below the label Generated access token has been used.
Click the Generate button to generate the access token, copy both the app key and access token, and store them safely where you can retrieve them when configuring the connector.
Note the setting of the App folder name (outlined in blue). In this example, this is the root folder on Dropbox from where any files you put or fetch with the connector will originate.
Harmony
If you haven't already obtained a Harmony username and password, you will need one before proceeding. (A trial license is sufficient: go to https://jitterbit.com and click on the Request Trial button to sign up.)
Jitterbit connector registration
All Jitterbit connectors require registration, which involves using a Jitterbit API to register the connector using your Harmony credentials.
To register the connector and obtain the registration values, use the Postman collection included in the Dropbox connector as postman/JitterbitConnectorManagerAPI.collection.json.
Before running the REST API, import the environment variables from postman/jitterbit-env-variable-postman.json into Postman and associate them with the collection.
Edit the environment and enter the host (as defined by your region; see Find my region), email (your-jitterbit-harmony-username@example.com), password (your Harmony password), and connector name environment variables appropriately:
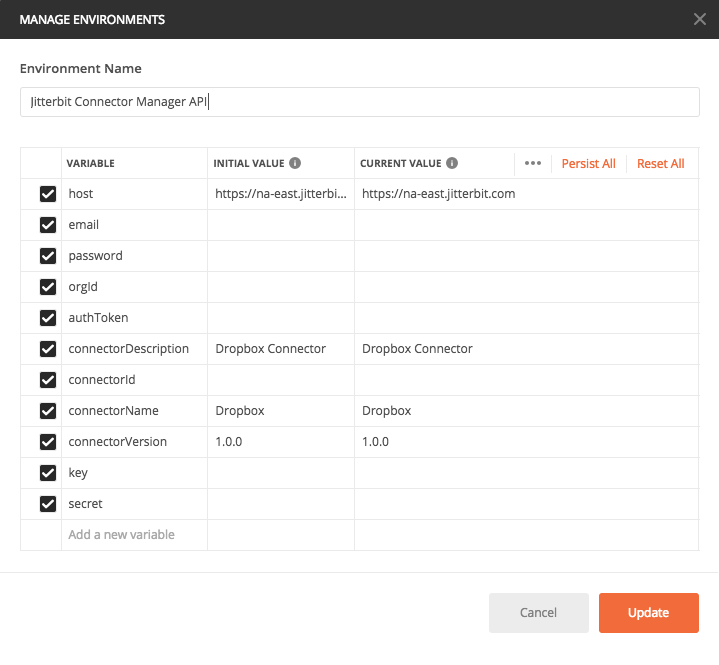
The name that the connector is registered under must match the value in the adapter.json file used to describe the UI. For this tutorial, the connector name provided in the Dropbox adapter.json file is Dropbox. For details on the UI file, see Connector implementation and Connector SDK UI components.
Now, from within Postman, run these two APIs in order:
Log In UserRegister a Connector
(The other APIs in the collection can be used to list and delete existing connectors that you have previously registered, and to confirm the validity of a connector's key and secret.)
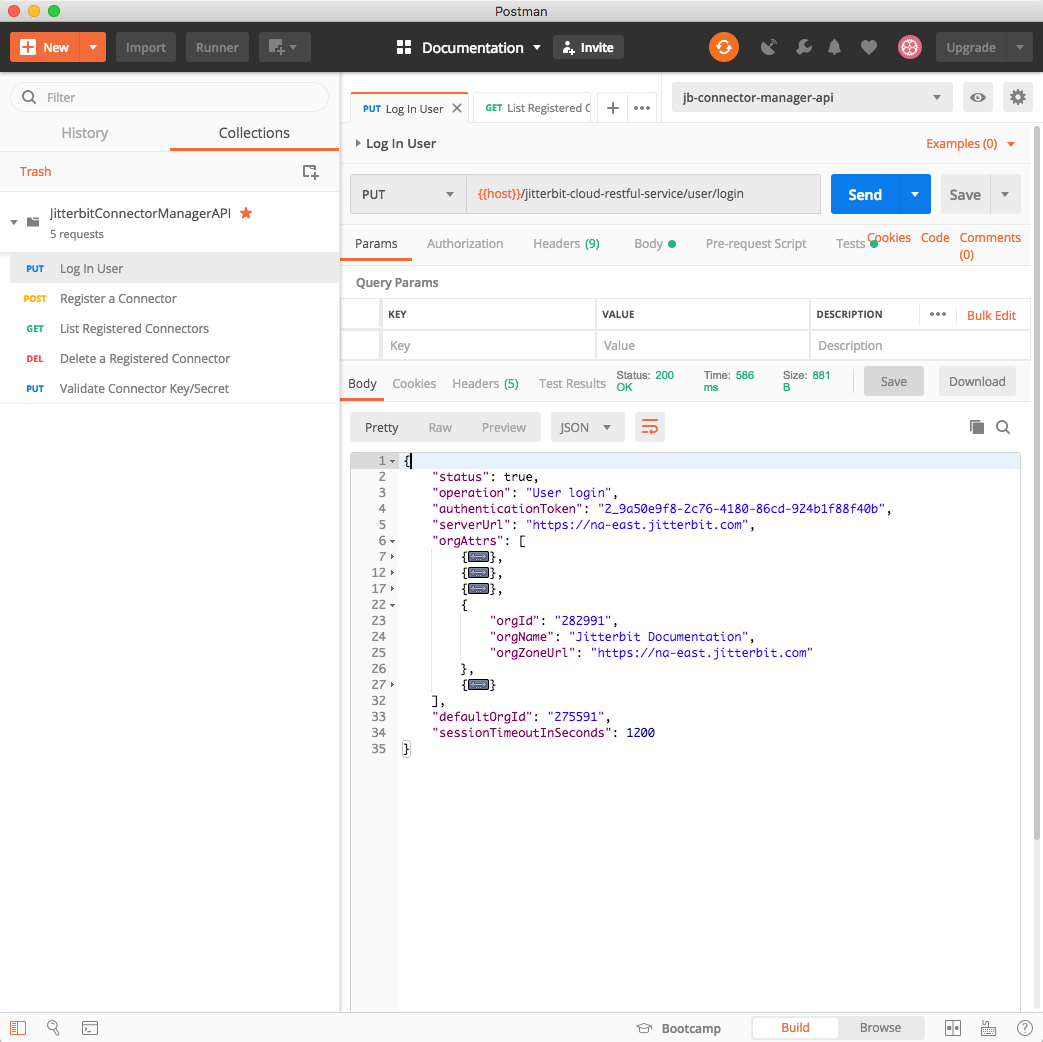
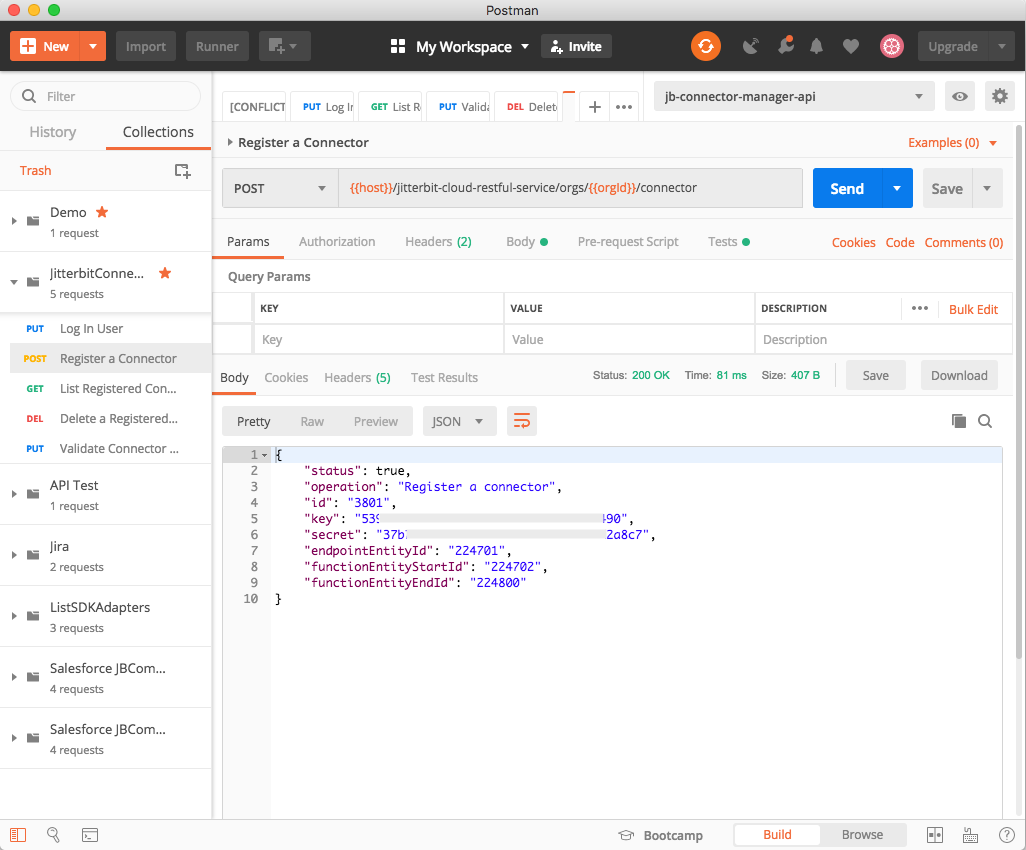
The response returned by the Register Connector API contains the key-values that are needed for the connector's manifest to complete the registration of the connector. You should receive a response such as:
{
  "status": true,
  "operation": "Register a connector",
  "id": "3691",
  "key": "XXXXXXXX-XXXX-XXXX-XXXX-XXXXXXXXXXXX",
  "secret": "XXXXXXXX-XXXX-XXXX-XXXX-XXXXXXXXXXXX",
  "endpointEntityId": "20101",
  "functionEntityStartId": "20102",
  "functionEntityEndId": "20200"
}
As can be seen from this example, a connector has been registered, has an endpoint entity ID of 20101, and can have function activity entity IDs ranging from 20102 to 20200.
| Register Connector API | Manifest File Keys |
|---|---|
key | Jitterbit-Connector-Key |
secret | Jitterbit-Connector-Secret |
endpointEntityId | Jitterbit-Connector-Endpoint-EntityTypeId |
functionEntityStartId | Jitterbit-Activity-EntityTypeId-<first_activity> |
functionEntityEndId | Jitterbit-Activity-EntityTypeId-<last_activity> |
The key and secret returned will become, following the table above, the Jitterbit-Connector-Key and Jitterbit-Connector-Secret in the manifest for the connector.
The connector has been allocated an endpoint ID and a range of activity (function) endpoint IDs, from the first to the last. In the case of the Dropbox connector, which has four activities (Fetch File, Get File, Process File, and Put File), you would assign individual IDs to each activity such that they fall inside the assigned range. A maximum of 99 activities can be assigned to an individual connector.
Complete the manifest file
With the information obtained, you can now set the values in the manifest file MANIFEST.MF located in the cloned Dropbox connector GitHub repository in src/main/resources/META-INF:
Author: Jitterbit
Version: 1.0.0
Jitterbit-Connector-Key: <key>
Jitterbit-Connector-Secret: <secret>
Jitterbit-Connector-Endpoint-EntityTypeId: <endpoint_type_id>
Jitterbit-Activity-EntityTypeId-fetch: <id-1>
Jitterbit-Activity-EntityTypeId-put: <id-2>
Jitterbit-Activity-EntityTypeId-process: <id-3>
Jitterbit-Activity-EntityTypeId-get: <id-4>
Jitterbit-Connector-UI: adapter.json
Class-Path: lib/dropbox-core-sdk-3.0.6.jar
The key, secret, and IDs were returned from the registration of the connector. As the Dropbox connector has four activities, you can use the starting ID for Jitterbit-Activity-EntityTypeId-fetch (the Fetch File activity) and then increment the IDs for the other three activities. The last activity must be less than or equal to the functionEntityEndId. Complete these values prior to building the connector. Note that there must be a space between the colon of the label and the value in each line of the manifest file.
Warning
If you are building the connector on Windows, note that the manifest file must have a trailing carriage return/linefeed as the last line; otherwise, the last entry (Class-Path) will be skipped and not included in the manifest file included in the output JAR file.
Build the Dropbox connector
Having edited and saved the manifest entries, you are now ready to build the connector. Run these commands within the dropbox-connector directory that contains the cloned repository with the edited manifest:
export APP_KEY=<dropbox-app-key>
export ACCESS_TOKEN=<dropbox-access-token>
mvn jaxb2:xjc compile install
Note
If your JAVA_HOME PATH variable isn't set to Java SE Development Kit 8, you can temporarily set it accordingly for a single Maven build with the following command:
JAVA_HOME="/Path/to/JDK/jdk-1.8.jdk/Contents/Home" mvn jaxb2:xjc compile install
This will compile, test, build, package, and install the connector. The completed JAR file will be at:
dropbox-connector/target/jitterbit-connector-dropbox-1.0.0.jar
Install the connector
The completed connector can now be installed on a private agent. (For details on installing agents, see System requirements for private agents).
For the agent to find the connector, the connector JAR needs to be placed in the agent's connectors directory. Typically, that is located at:
- Linux:
/opt/jitterbit/Connectors - Windows:
C:\Program Files (x86)\Jitterbit Agent\Connectors(administrator privileges required) - Docker: the directory mapped to
/opt/jitterbit/Connectorsin the Docker command, such as--volume "$(pwd)/dropbox-connector:/opt/jitterbit/Connectors"
If you are using the Harmony Docker private agent image, it allows you to mount a host directory to a container directory such as /connectors. Within the Docker container, the agent will scan the /opt/jitterbit/Connectors directory for JAR files that contain a connector implementation (only one connector implementation is allowed in each JAR file). To deploy the Dropbox connector JAR after it has been built, while running the agent as a Docker container, copy the JAR file from the build target directory to the directory mounted as the connectors directory and restart the container. When the Docker container starts, it copies the contents of the mounted directory to the /opt/jitterbit/Connectors directory.
In all of the cases, do not use the Maven build directory as the connectors directory, as the scanning of the directory will get confused as it comes across the intermediate stages of the Maven build process. Instead, copy the completed JAR to the connectors directory when the build process is finished. This can be either be performed manually or incorporated as a step after a successful build.
The agent continually scans the connectors directory for changes, and automatically reloads any connector JARs that it finds that are new or have been modified. This means that as you develop your connector, simply copy each new build over to the connectors directory to have it automatically reloaded by the agent.
Docker example
For example, on a Linux system running a Docker private agent, running this command in the parent directory of the dropbox-connector will start a Docker agent with the target directory mapped to the /opt/jitterbit/Connectors directory of the agent:
docker run --interactive --tty --name=jitterbit-agent --publish 3000:3000 \
           --volume "$(pwd)/dropbox-connector/target:/opt/jitterbit/Connectors" \
           --env-file "$(pwd)/private-agent.env" \
           jitterbit/agent
where private-agent.env contains the environment variables used for connecting to Harmony.
The file private-agent.env would look like this; substitute appropriate values:
HARMONY_USERNAME="<email_address>"
HARMONY_PASSWORD="<password>"
HARMONY_ORG="<your_organization_name>"
HARMONY_AGENT_GROUP="<your_agent_group_name>"
HARMONY_AGENT="<your_agent_name>"
In a different command prompt (or PowerShell, for Windows OS) you can check that the Docker container is up by using:
docker ps -a

CONTAINER ID IMAGE                  COMMAND                CREATED       STATUS       PORTS                                              NAMES
xxxxxxxxxxxx jitterbit/agent:latest "/entrypoint.sh /ag…" 2 minutes ago Up 2 minutes 46908-46909/tcp, 0.0.0.0:3000->3000/tcp, 46912/tcp jitterbit-agent
Note
Once the container is up and passes the health check, you can log in to the Harmony portal and go to the Management Console Agents page to check if the agent has been registered and is running.
In a different command prompt (or PowerShell, for Windows OS), you can access the container using a command to open a shell in the Docker container:
docker exec -ti jitterbit-agent /bin/bash

root@b3160de34840:/opt/jitterbit#
At this point, you have full access to the agent container. You can stop and restart the agent using the /opt/jitterbit/bin/jitterbit utility. For a help message, from within the container use:
/opt/jitterbit/bin/jitterbit help
From within the container, tail the Tomcat logs to check the connector logs:
tail -f tomcat/logs/catalina.out

. . .
2018-04-26 13:28:48,957 INFO com.jitterbit.integration.server.api.ws.connectorframework.ConnectorLoader:63 - Loading connectors...
. . .
2018-04-26 13:28:49,185 WARN com.jitterbit.integration.server.api.ws.connectorframework.ConnectorClassLoader:96 - Could not load Jitterbit Connector via manifest.mf; no Main-Class or Jitterbit-Connector-Factory-Class attributes defined.
2018-04-26 13:28:49,186 WARN com.jitterbit.integration.server.api.ws.connectorframework.ConnectorClassLoader:97 - Falling back to annotation system
2018-04-26 13:28:49,187 INFO com.jitterbit.integration.server.api.ws.connectorframework.ConnectorClassLoader:440 - Temporary Directory for undeploying connectors bundle: /opt/jitterbit/tomcat/temp
2018-04-26 13:28:49,517 INFO com.jitterbit.integration.server.api.ws.connectorframework.ConnectorClassLoader:377 - Loading annotated class java.lang.Class
2018-04-26 13:28:49,527 INFO com.jitterbit.integration.server.api.ws.connectorframework.ConnectorClassLoader:395 - Register Activity Factory with id: 200500 name: put factory: org.jitterbit.connector.dropbox.activities.PutFileActivity$PutFileActivityFactory
2018-04-26 13:28:49,530 INFO com.jitterbit.integration.server.api.ws.connectorframework.ConnectorClassLoader:395 - Register Activity Factory with id: 200402 name: fetch factory: org.jitterbit.connector.dropbox.activities.FetchFileActivity$FetchFileActivityFactory
. . .
26-Apr-2018 13:29:22.615 INFO [pool-1-thread-1] org.jitterbit.connector.ConnectorRegistry.registerConnector Connector Name: Dropbox Author: Jitterbit Connector Key: 929f90...52562 Endpoint Entity Type Id: 200401 Internal Connector: false Activities Id: {fetch=200402, put=200500}
26-Apr-2018 13:29:22.617 INFO [pool-1-thread-1] org.jitterbit.connector.sdk.BaseJitterbitConnector.onInit onInit() connector name: Dropbox
. . .
If you see messages similar to these in the logs, it means that the Dropbox connector has been successfully loaded and started. You can now log in to the Harmony portal and access Integration Studio to start using the connector.
In a project within the environment that the private agent is associated with, you should see the Dropbox connector in the design component palette. You can then configure the endpoint as you would using any other connector in Cloud Studio.
Use the Dropbox connector
You should now see the connector in projects that use the environment associated with your private agent and the connector. It should appear in the design component palette Connectivity tab when the Show dropdown is set to filter on Connectors or All:
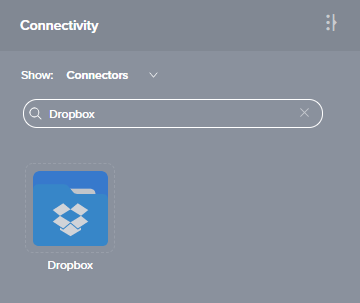
If not, see the troubleshooting section at the end of this document for suggestions before proceeding further.
Configure a Dropbox connection
The first task is to use the Dropbox connector to configure a Dropbox connection to establish connectivity with the endpoint. In the component palette, making sure that the Show dropdown is set to filter on Connectors or All, click the Dropbox connector to open the connection configuration. Give the connection a name (such as "Dropbox") and enter the Dropbox App Key and Dropbox Access Token that you previously saved:
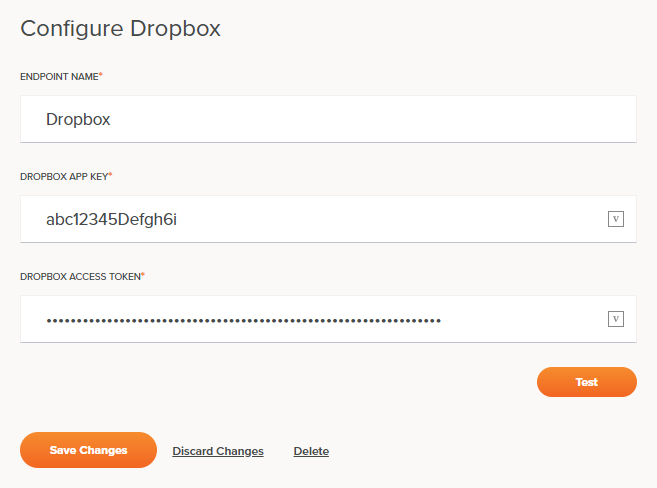
Click the Test button to confirm the connection is successful, and then click the Save Changes button to save the configuration and return to the workflow.
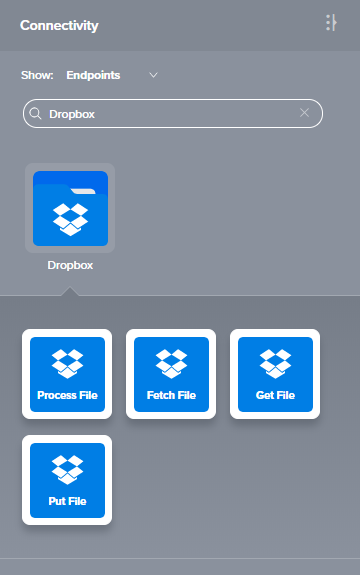
You should now see four activities under the configured Dropbox connection in the component palette: Process File, Fetch File, Get File, and Put File. These activities can now be added to operations on the design canvas and configured as sources or targets in an operation. Together, a specific connection and its activities are referred to as an endpoint:
Tutorial scenarios
These tutorial scenarios each demonstrate a different activity of the connector:
- Scenario 1: Fetch File: Fetch a text file from Dropbox and write it as an XML file to an FTP server.
- Scenario 2: Fetch File: Fetch a text file from Dropbox and write it as a text file to an FTP server.
- Scenario 3: Put File: Read a text file from an FTP server and put it into Dropbox as a text file.
- Scenario 4: Process File: Fetch an XML file from Dropbox, process it, and write it as a JSON file to an FTP server.
- Scenario 5: Get File: Get a file from Dropbox and write it to an FTP server.
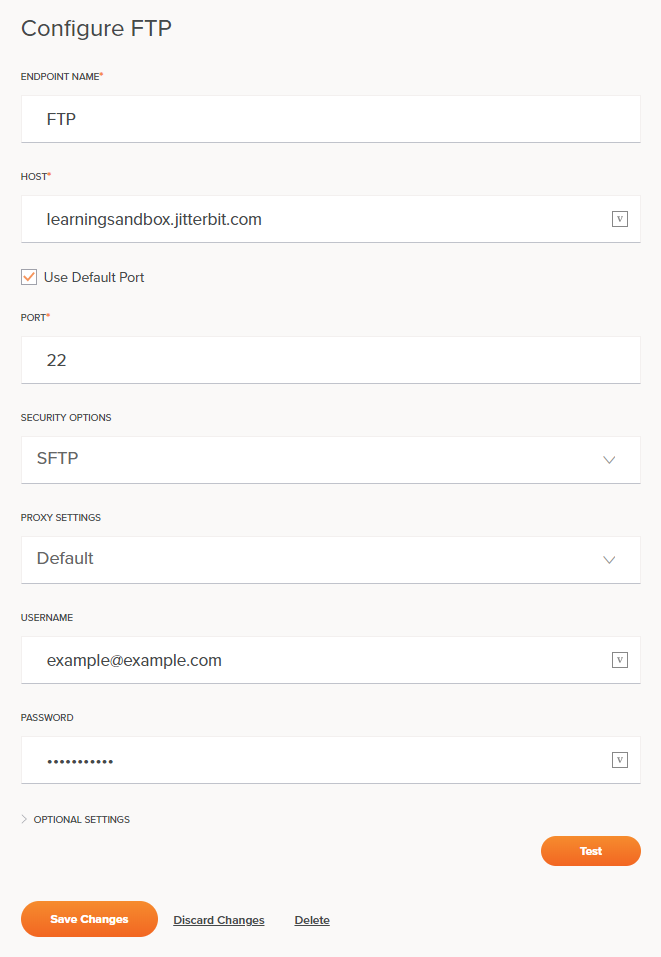
To complete the tutorial scenarios, you will need credentials (host, username, and password) for an FTP server. If you have recently completed the Jitterbit University training and have valid credentials, you can use the FTP server from that course. Configure an FTP endpoint, entering the host, username, and password. In these tutorials, the FTP endpoint is named using the name "FTP":
Troubleshooting
If you are unable to load the connector or see it in Integration Studio, check out the tips on the Connector SDK troubleshooting page.