Connector registration
Introduction
All connectors used in Jitterbit iPaaS are required to be registered, and developers using the Jitterbit Connector SDK need to register their connectors prior to building and packaging them.
Each connector and each of its activities receives an unique ID from Jitterbit that identifies it from all other connectors and their activities.
Before building a connector JAR file, you'll need to obtain these values for each connector:
- Connector ID
- Connector key
- Connector secret
- Endpoint entity ID
- Starting activity ID
- Ending activity ID
REST API to register connectors
To obtain these values, use the Jitterbit Connector Manager API, available as a Postman collection included in the Dropbox connector at postman/JitterbitConnectorManagerAPI.collection.json.
The collection provides these functions ("requests"):
- Log In User
- Register a Connector
- List Registered Connectors
- Delete a Register Connector
- Validate Connector Key/Secret
Configure the API in Postman
Before running the REST API, import the environment variables from postman/JitterbitConnectorManagerAPIEnvVariables.json into Postman and associate them with the collection.
Edit the Postman environment and enter values for the keys host (as defined by your region; see Find my region), email (your Harmony username), password (your Harmony password), Harmony orgID, and the connector's name, version, and description. The other environment variables (authToken, connectorID, key, and secret) will be entered by Postman as you use the APIs:
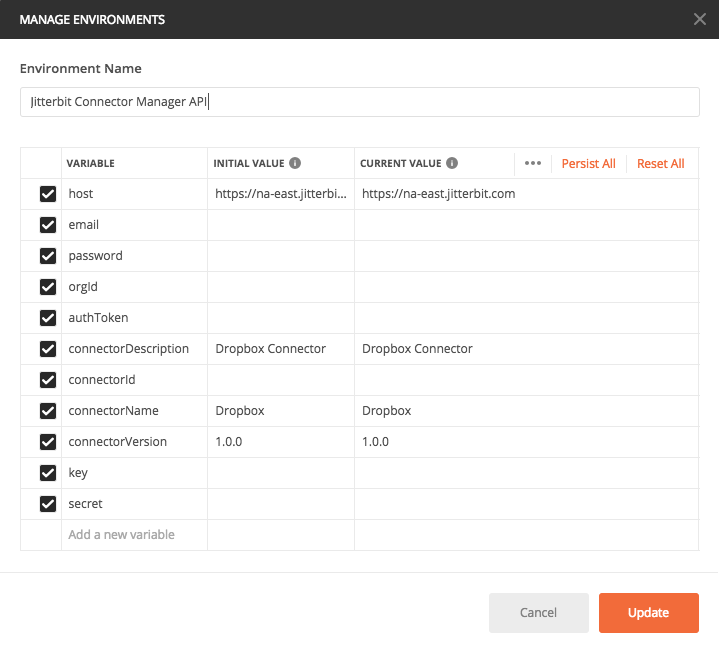
The name that the connector is registered under must match the value in the adapter.json file used to describe the UI. (For details on the Integration Studio UI and the adapter.json file, see Connector Implementation and Connector SDK UI Components.)
At the start of a session of running the API functions, always first run the Log In User function to obtain an authenticationToken. This token will be retained by Postman and used for subsequent requests in the same session.
Register a connector
To register a connector, run these two APIs in order from with Postman:
-
Log In User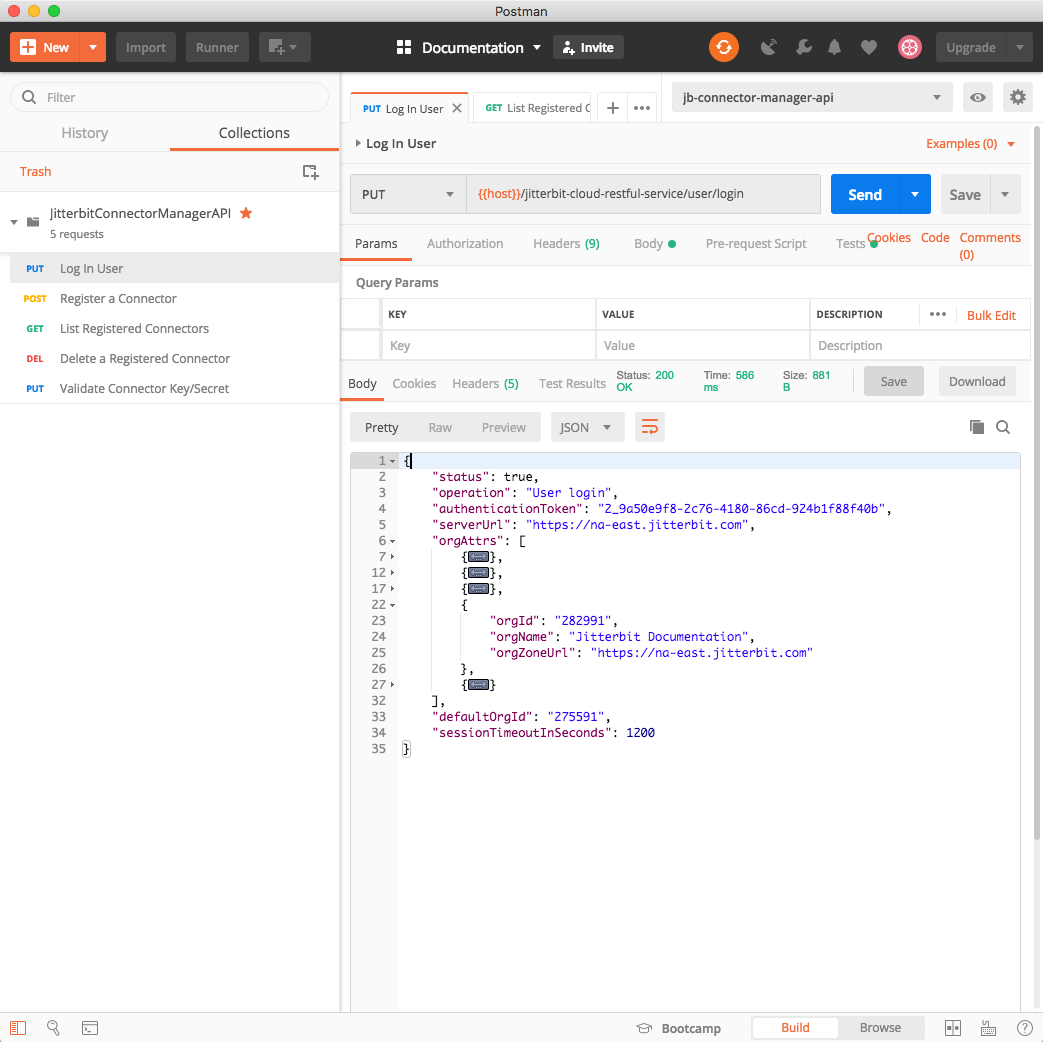
-
Register a Connector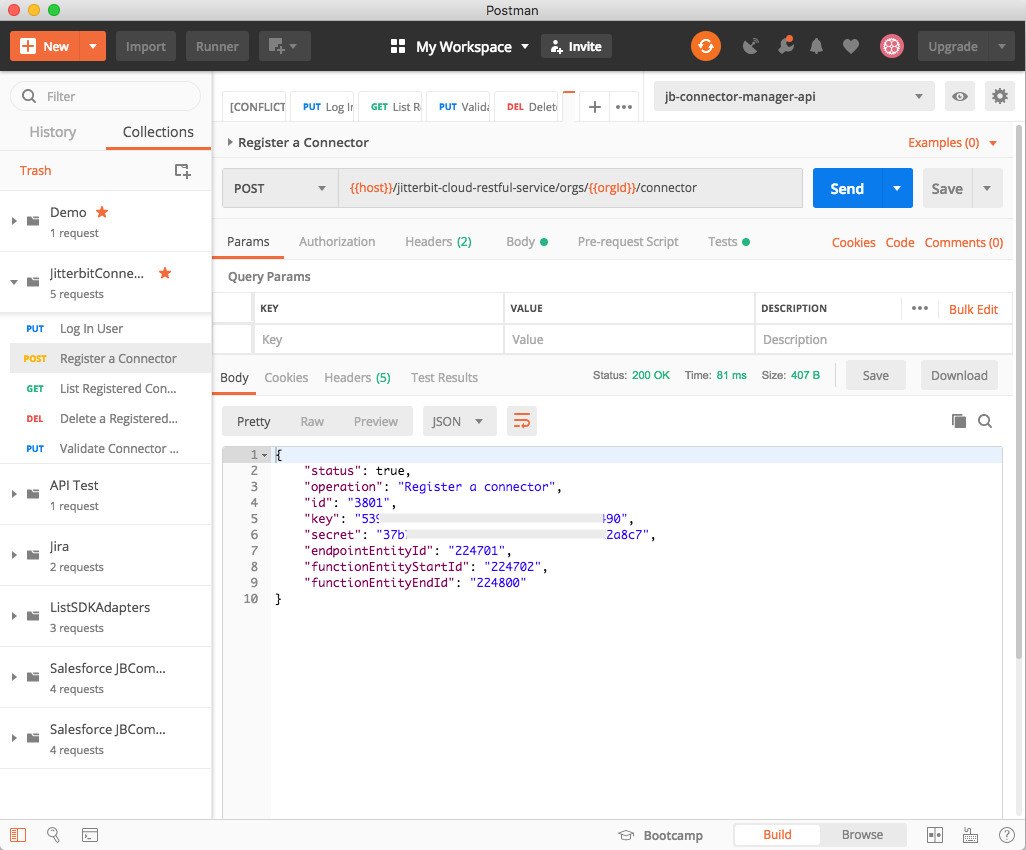
The response returned by the Register a Connector API contains the key-values that are needed for the connector's manifest to complete the registration of the connector. You should receive a response such as:
{
  "status": true,
  "operation": "Register a connector",
  "id": "3691",
  "key": "41384368...d871d2d7ec9",
  "secret": "bb574709...7f2f79f60c49",
  "endpointEntityId": "20101",
  "functionEntityStartId": "20102",
  "functionEntityEndId": "20200"
}
As can be seen from this example, a connector has been registered, has an ID of 3691, has an endpoint entity ID of 20101, and can have function activity entity IDs ranging from 20102 through 20200. A key and a secret have also been returned.
| Register Connector API | Manifest File Keys |
|---|---|
key | Jitterbit-Connector-Key |
secret | Jitterbit-Connector-Secret |
endpointEntityId | Jitterbit-Connector-Endpoint-EntityTypeId |
functionEntityStartId | Jitterbit-Activity-EntityTypeId-<first_activity> |
functionEntityEndId | Jitterbit-Activity-EntityTypeId-<last_activity> |
The key and secret returned will become, as shown in the table above, the Jitterbit-Connector-Key and Jitterbit-Connector-Secret in the manifest for the container.
The connector has been allocated an endpoint ID and a range of activity (function) endpoint IDs, from the first to the last. In the case of the Dropbox connector, which has four activities (Fetch File, Get File, Process File, and Put File), you would assign individual IDs to each activity such that they fall inside the assigned range. A maximum of 99 activities can be assigned to an individual connector.
Connectors can be registered at any point in the development process (either while you are formulating your design or just prior to packaging). However, it is a good practice to do this as soon as possible, in case there are any problems in your registration or in obtaining the necessary keys.
List registered connectors
Use this method to see all of the connectors currently registered in an organization. It uses the host and orgId variables of the Postman environment.
From within Postman, run these two APIs in order:
-
Log In User(required only if you have not already run it in the current session; see Registering a connector) -
List Registered ConnectorsThis screenshot shows the list of registered connectors returned for the current organization:
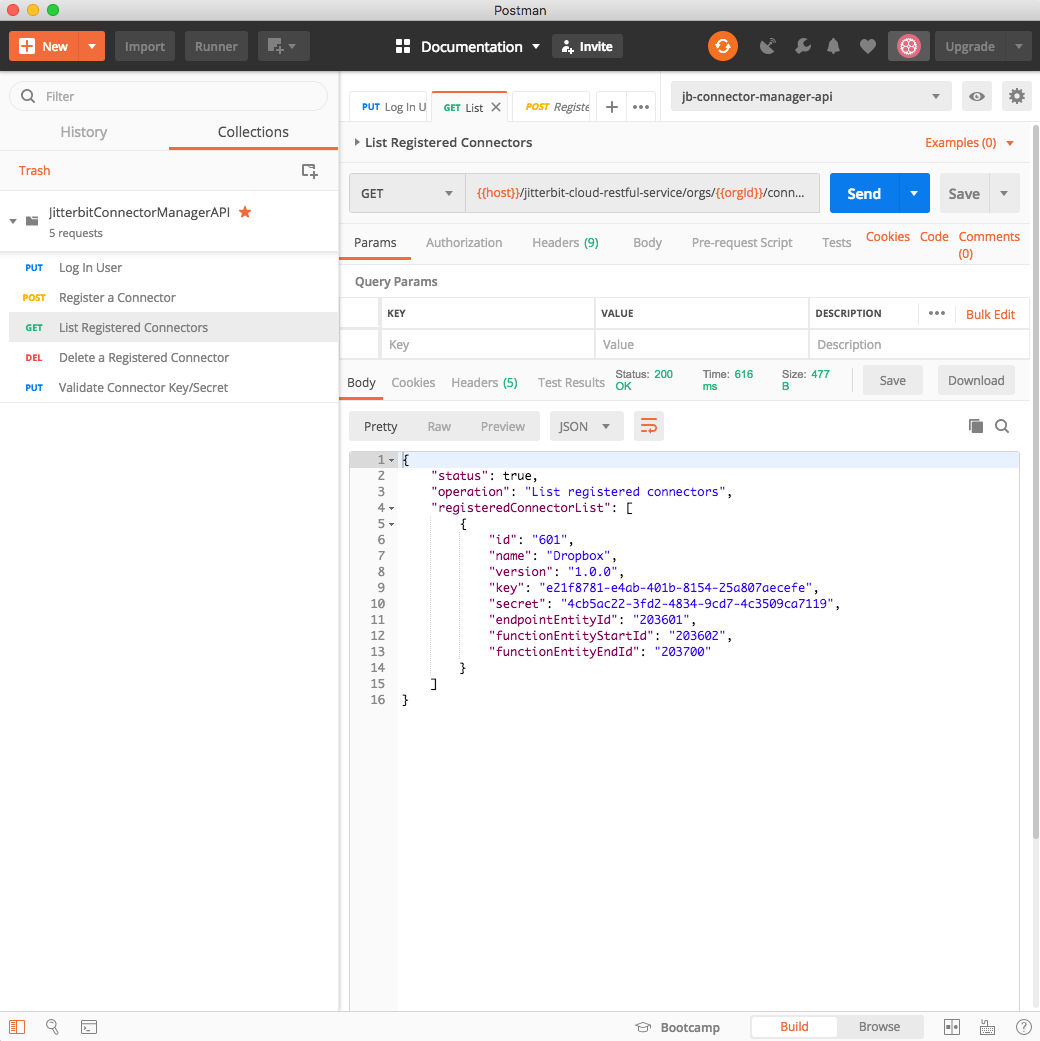
Delete a registered connector
If needed, you can delete a registered connector. To delete a connector requires that you have both the organization (orgId) that it belongs to and the connector ID (connectorId). The connector ID was displayed when the connector was registered and can be found by using the List registered connectors method to see all of the connectors currently registered in an organization.
From within Postman, run these two APIs in order:
-
Log In User(required only if you have not already run it in the current session; see Registering a connector) -
Delete a Registered ConnectorThis screenshot shows the message returned if the connector specified by the
connectorIdwas successfully deleted: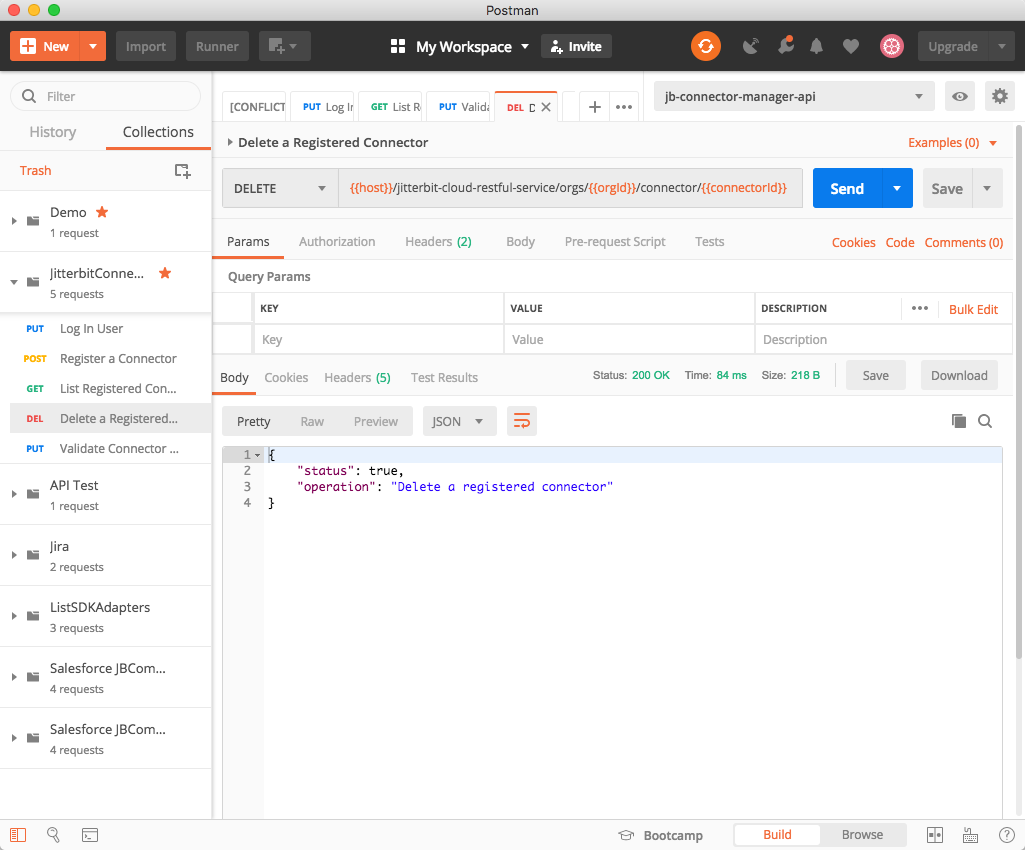
Validate a connector key/secret
You can validate the name, key, and secret of a registered connector. Enter the values into the connectorName, key, and secret Postman environment variables, and then use this API. Note that all three items are required, including the connector name, in order to validate the connector key and secret.
These values were displayed when the connector was registered and can be found by using the List registered connectors method to see all of the connectors currently registered in an organization.
From within Postman, run these two APIs in order:
-
Log In User(required only if you have not already run it in the current session; see Registering a Connector) -
Validate Connector Key/SecretThis screenshot shows the message returned if the connector specified by the
connectorIdwas successfully validated (the key and secret are correct for the named connector):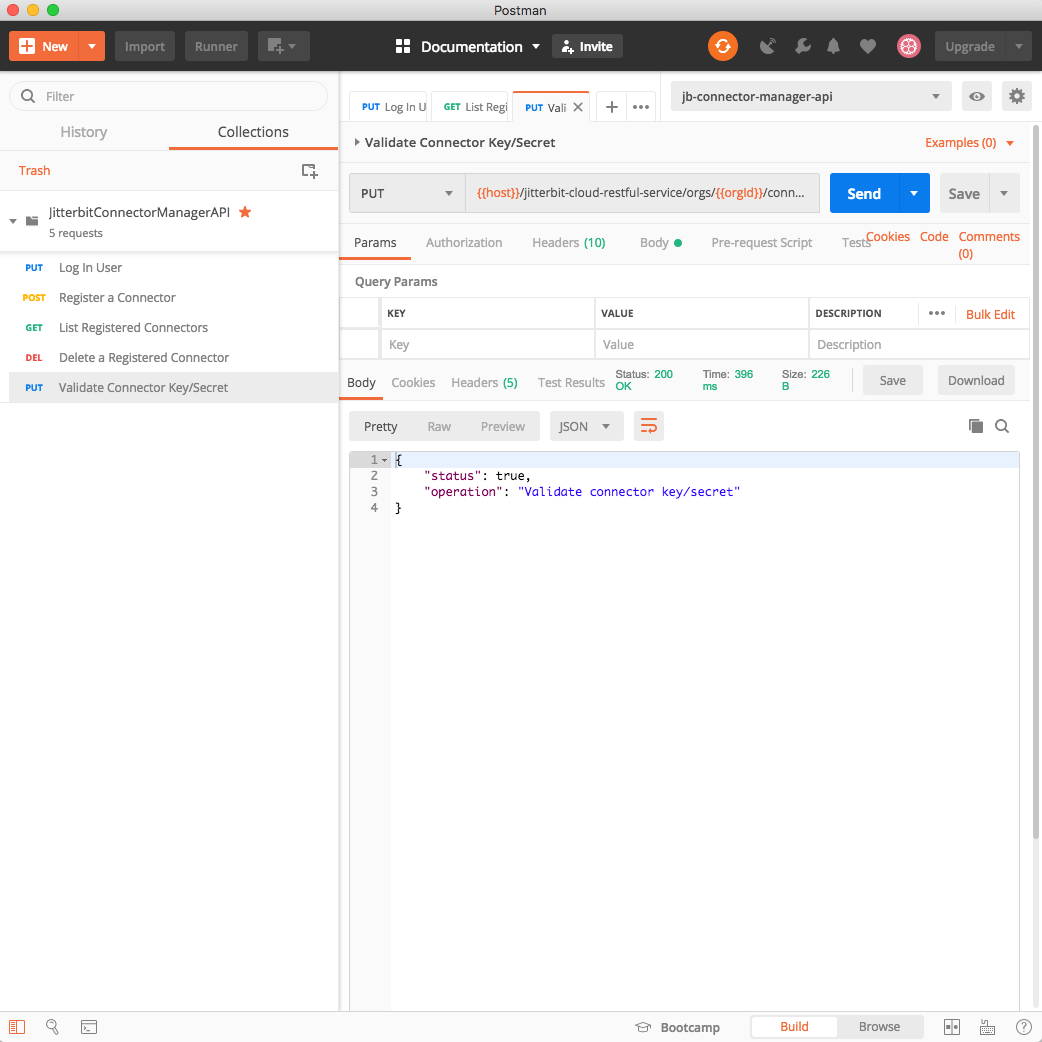
Connector manifest
As part of the Maven build, these attributes must be present as part of the MANIFEST.MF to indicate that it is a Harmony connector. Using the manifest from the Dropbox connector, with its activities—Fetch File, Put File, Process File, and Get File—and the values for endpointEntityId, functionEntityStartID, and functionEntityEndID as shown above, you could construct a manifest such as:
Author: <author_name>
Version: 1.0.0
Jitterbit-Connector-Key: XXXXXXXX-XXXX-XXXX-XXXX-XXXXXXXXXXXX
Jitterbit-Connector-Secret: XXXXXXXX-XXXX-XXXX-XXXX-XXXXXXXXXXXX
Jitterbit-Connector-Endpoint-Id: 20101
Jitterbit-Connector-UI: adapter.json
Jitterbit-Activity-EntityTypeId-fetch: 20102
Jitterbit-Activity-EntityTypeId-put: 20103
Jitterbit-Activity-EntityTypeId-process: 20104
Jitterbit-Activity-EntityTypeId-get: 20105
Jitterbit-ConnectorClassLoader-Version: 1.0.0
Class-Path: lib/dropbox-core-sdk-3.0.6.jar
| Manifest File Key | Description |
|---|---|
Author | Replace <author_name> with your name. |
Version | Set the appropriate semantic version identifier (for example, version 1.0.0). |
Jitterbit-Connector-* | See the section above on REST API for Registering Connectors for details on obtaining these attributes using a REST API. |
Jitterbit-Activity-* | See the section above on REST API for Registering Connectors for details on obtaining these attributes using a REST API. |
Jitterbit-Connector-UI | (Optional) Provides the file that contains the UI declarations for the connector. Default name is adapter.json. |
Jitterbit-Connector-Factory-Class | (Optional) Provides the factory class that creates an instance of JitterbitConnector. If not provided then you must use an @Connector annotation on the entry class that implements the JitterbitConnector interface or extends the abstract class BaseJitterbitConnector. |
Jitterbit-ConnectorClassLoader-Version | (Optional) Current version is 1.0.0. Specifying this classloader prevents collisions when loading Java files. Available with agent versions 10.68 and later. |
Class-Path | A list of space-separated URLs of any third-party JARs that make up the connector. In the example above, it contains Dropbox's Dropbox SDK JAR. |
In this example from the previous section, the connector endpoint ID was 20101, the starting activity ID was 20102, and the ending activity ID was 20200. The Fetch File activity can then be assigned 20102, the Put File activity can be assigned 20103, the Process File activity can be assigned 20104, and the Get File activity can be assigned 20105. Additional activities can, if necessary, be registered and assigned IDs as long as they fall within the allocated range.
Change a registered connector
If you make changes to a registered connector, and especially to one that has been deployed in production, be aware of how changes can and will affect existing projects that use that connector.
When a connector is deployed in Harmony, the IDs specified in the MANIFEST.MF file are revised to ensure that all instances of the connector across different regions are consistent.
In general, follow these practices for assigning activities in the MANIFEST.MF:
- Always assign the activities in order and increment each activity by 1. Do not leave any gaps.
- If you know that you will be adding a activity later, it's best to add it earlier and stub out code for it in the Java files as no-ops. These can be filled in when ready.
- Activities can be hidden by not including them in the
adapter.jsonfile. - Once assigned and deployed, do not change the order of activities as listed in the
MANIFEST.MF. - Add any new activities after the last activity, in the next position available.
- Do not delete an existing activity from the
MANIFEST.MF. Instead, remove the activity fromadapter.json, and stub out its code in the Java files to be no-ops.
Deleting an existing activity that is in the middle of a list of activities can result in the IDs of the other activities shifting and an Update activity becoming a Create activity in existing projects.