New recipe creation
Introduction
A Citizen Integrator recipe is a reusable integration template that provides a step-by-step guide through Citizen Integrator, available through the Harmony Portal. Citizen Integrator recipes can be used by members of a Harmony organization so they can easily configure a Design Studio integration for a specific use case.
This document covers the manual creation of Citizen Integrator recipes. Recipes can also be created using the Citizen Integrator interface. See Citizen Integrator - Generate or edit recipe for details.
A Citizen Integrator recipe consists of two parts:
- a Design Studio Jitterpak (file suffix
.jpkor.JPK); and - a Citizen Integrator recipe metadata JSON file (file suffix
.jsonor.JSON) that provides the steps a user goes through to configure the integration.
Here is a summary of the steps needed to create a recipe that can then be made available through the Citizen Integrator web interface:
Step 1: Create a Jitterpak
Create a Jitterpak (JPK) using Harmony Design Studio. The Jitterpak will be used as the basis for the recipe. See Creating Jitterpaks for Recipes.
Step 2: Create the recipe metadata
Create a recipe metadata file (a JSON file). The recipe metadata includes the steps that users complete through the web interface, and associates user-provided information with the Jitterpak. See Creating recipe metadata for best practices, a sample walkthrough, a description of recipe step types, and documentation of components of a recipe metadata file.
Step 3: Validate the recipe metadata
Validate your recipe metadata file using the jbcli. See Validate a recipe of the Jitterbit Command Line Interface.
Step 4: Upload the Jitterpak and recipe metadata
Upload your Jitterpak and recipe metadata file to your recipe repository. See Upload a new recipe and Jitterpak of the Jitterbit Command Line Interface. You can also upload recipes through the Citizen Integrator web interface as described on the Citizen Integrator - Dashboard or Citizen Integrator - My recipes pages.
Step 5: Configure and deploy the recipe
Your new recipe is now available for members of your organization to use through the Citizen Integrator web interface. See Citizen Integrator - Configure Recipe for user instructions on configuring and deploying recipes.
Create Jitterpaks for recipes
When creating a new Citizen Integrator recipe, we recommend starting by first creating a Design Studio Jitterpak that contains the project structure for your recipe template.
Jitterpaks are not specific to recipe functionality; they are a core function of the full Design Studio application. Users who want to create new recipes are expected to already be familiar with Design Studio. For more information, please reference the materials under Design Studio and Jitterpaks.
Note
Citizen Integrator recipes are created from Design Studio projects. For Cloud Studio, instead use Cloud Studio integration recipes or Cloud Studio process remplates, available from Jitterbit Marketplace.
Jitterpak best practices
When creating a Jitterpak for use with Citizen Integrator recipes, we recommend these best practices for recipe creation:
-
Define your typical use case(s)
Before starting on any Jitterpak or recipe, you should have a good idea of what you want your users to be able to accomplish by using the recipe. Keep in mind that you can create multiple recipes if needed. The use case will help you decide what to build into your Jitterpak and the steps you want a user to fill out via the Citizen Integrator interface.
-
Reference examples for help getting started
Check out our public Jitterpaks for reference, or if you find one that is similar to your use case, you may even want to start with it. To download any of the Jitterpaks built for our public recipes, follow Get a Specific Recipe and Save the Jitterpak Locally under Jitterbit Command Line Interface. Or, reference our Jitterpak Library.
-
Create project variables wherever possible
Project variables are key to creating recipes that can be easily filled out by a user through the Citizen Integrator web interface. Think of project variables as fields with specific information that you want users to provide when using your recipe. Then create those items as project variables in your Jitterpak. For example, connection information for new endpoints.
-
Namespace project variables for reference later
When you create project variables, it’s a good practice to namespace them. For example, a project variable for host could be named “db.host” to indicate that it refers to a database host. This will make it easier to read the project variables when creating your recipe metadata.
-
Place operations at the root level if you want to run them via a recipe step
Any operation that you want to run through a RunOperation step in your recipe must be placed in the root level of the operations folder within Design Studio. That is, if you have operations within subfolders under your operations tree, these will not run when exposed through a RunOperation step. This caveat is only for operations being run at a specific step of the recipe. If your operations are within subfolders, these will still run when saving and deploying the recipe.
-
Include WriteToOperationLog on operations you want to run via a recipe step
Include WriteToOperationLog on operations that you want to run through a RunOperation step in your recipe (see Logging and error functions). The WriteToOperationLog messages will be displayed in the panel below the RunOperation button in the Citizen Integrator interface and provide feedback to the recipe user about the executed operation.
-
Use project variable values to test, but then remove values when exporting as a Jitterpak
Wherever you use project variables in your Jitterpak, make sure not to include specific values when you export the Jitterpak. Remember, the values are typically blank so they can be filled out by the user when configuring the recipe. It is always a good idea to test your Design Studio project with specific values, but be sure to remove these prior to exporting. Here are a couple options for removing values:
-
All values: To remove all project variable values, when you export as a Jitterpak, uncheck the box “Include Project Variable values.” This is the standard and recommended way to remove project variable values.
-
Some values: To remove only specific project variables, simply remove the default value on the project variable. This option may be more appropriate than using the checkbox described above if you want to intentionally keep some project variable values. For example, if your recipe is private within your organization, you could include information such as a URL that will not change per user filling out the recipe.
-
-
Take note of built-in schedules
If you include a schedule within the Jitterpak, take note of when the operation is scheduled to run and make sure to document this in the recipe metadata. Otherwise, users will not be aware of the schedule that is built into the Jitterpak. Schedules are not currently available to be configured within a recipe.
Create recipe metadata
You can start authoring Citizen Integrator recipe metadata while creating your Jitterpak, or create the metadata when you’re done. The recipe metadata provides two primary functions:
- Defines the steps that users will need to go through to configure the recipe via the Citizen Integrator interface.
- Connects any user-provided values back to the recipe’s accompanying Jitterpak so that the newly configured operation(s) run as expected through Jitterbit.
This section is organized to provide a list of best practices for creating recipes, a sample walkthrough for creating a recipe, the types of steps available to be used in the recipe, and finally a comprehensive list of all possible parts of the recipe metadata file.
Metadata best practices
When creating your Citizen Integrator recipe metadata file, these are best practices are helpful to those new to creating recipes.
-
Reference examples to compare the Citizen Integrator interface with the recipe metadata
Take a look at how our public recipes are structured, comparing what you see in the Citizen Integrator interface with the actual recipe metadata file for that recipe. If you find one that is similar to your use case, you may even want to start with it.
-
Citizen Integrator interface: Access the Citizen Integrator interface using the Harmony Portal. See Citizen Integrator - Dashboard for more details.
-
Recipe metadata: Download the recipe metadata for any of our public recipes by following Get a specific recipe and save the Jitterpak locally of the Jitterbit Command Line Interface.
-
-
Build your recipe in iterations
Expect to need to make adjustments to your Jitterpak as you work on your recipe metadata, and vice versa. You can always upload a first version, check how it displays and works in the Citizen Integrator interface, and then continue to update your recipe files from the Citizen Integrator - My recipes page, or by following Upload a new recipe and Jitterpak and Update an existing recipe and Jitterpak of the Jitterbit Command Line Interface.
-
Include Introduction and Review steps in recipe metadata
It’s recommended to start with an Introduction step and end with a Review step to keep the recipes consistent. These sections both use the
org.jitterbit.integration.data.entity.Descriptiontype (described under Step types).-
The Introduction should be used to explain what the recipe is used for, describe any limitations, list standard fields, and/or provide prerequisite information someone using the recipe should be aware of.
-
The Review step should summarize and confirm for the user the expected behavior when the configured recipe is deployed. If you include a schedule within the Jitterpak, the Review step is a good place to document the time the operation is schedule to run. Remember to specify the timezone (UTC is the default within Design Studio, but you could also convert the time to your desired timezone within Design Studio and specify that).
-
-
Standardize names within your recipe metadata
Standardize your recipe name, project name, file names, and directory structure. This helps prevent unintentional errors in referring to parts within the recipe and makes it easier to manage all the parts of your recipe.
-
For endpoint-to-endpoint migration, order endpoints directionally
For migrations of one endpoint to another (e.g. migrating Salesforce Accounts to NetSuite Companies), order the endpoints directionally:
- In JSON file:
"name": "Migrate Salesforce Accounts to NetSuite Companies" - In JSON file:
"projectName": "salesforce_accounts-to-netsuite_companies" - Directory:
salesforce-to-netsuite/accounts-to-companies/ - File names:
salesforce_accounts-to-netsuite_companies.jpkandsalesforce_accounts-to-netsuite_companies.json
- In JSON file:
-
For endpoint synchronization, order endpoints alphabetically
For synchronizations of two endpoints (e.g. synchronizing Salesforce Accounts and NetSuite Companies) order the endpoints alphabetically:
- In JSON file:
"name": "Synchronize NetSuite Companies and Salesforce Accounts" - In JSON file:
"projectName": "netsuite_companies-salesforce_accounts" - Directory:
netsuite-salesforce/companies-accounts/ - File names:
netsuite_companies-salesforce_accounts.jpkandnetsuite_companies-salesforce_accounts.json
- In JSON file:
-
Define project variables at the end of the recipe metadata
Any project variables used within your Jitterpak and referenced within your recipe metadata steps should be defined at the end of your recipe metadata file.
-
Hide steps that you want to embed in other steps
You can specify a hidden attribute on a step to make it hidden from rending in the Citizen Integrator interface, but then reference that step using a path that points to an action with “useStepAsRequest.” This is a good idea if for example you set up a step for testing connection information, but want to include it as a Test Connection button within another step.
-
Leave out fields that will be generated upon upload of the recipe metadata
Some fields in the recipe metadata file are not specified upon upload of the file and are instead generated by the system when the file is uploaded. These fields come at the beginning and end of the recipe metadata file.
- id: This field is populated when the recipe metadata is uploaded to the recipe repository. After upload, you can find out the generated Recipe ID by using List all recipes of the Jitterbit Command Line Interface.
- guid: Required This field is populated when an associated Jitterpak is uploaded to the recipe repository. The GUID (globally unique identifier) is populated with that of the associated Jitterpak. However, this field is required so you must still include it in the file. The actual identifier will be updated upon upload.
- createdAt: The Unix epoch timestamp in milliseconds of when the recipe was first uploaded.
- updatedAt: The Unix epoch timestamp in milliseconds of when the recipe was last updated.
-
updatedBy
- userId: The Harmony username of the person who last updated the recipe.
- name: The name of the person who last updated the recipe.
- orgName: The name of organization to which the person who last updated the recipe belongs.
-
orgid: The ID of the organization to which the person who uploaded the recipe belongs. The recipe is owned by this organization and only the recipe author or an org Admin can update or delete the recipe (see Citizen Integrator - My recipes or the Jitterbit Command Line Interface).
-
author
- userId: The Harmony username of the person who uploaded the recipe.
- name: The name of the person who uploaded the recipe.
- orgName: The name of the organization to which the person who uploaded the recipe belongs.
After uploading a recipe, you can see the values generated for these fields when you use Get a specific recipe to return the recipe metadata (see the Jitterbit Command Line Interface).
-
Use HTML for rich text
If you want to use links, lists, bold, etc. within your recipe steps, try using HTML. Most fields where you might want to use these allow the use of HTML, granting you more control over the look and functionality of the recipe steps.
-
Validate prior to upload
It’s always a good idea to make sure that your recipe metadata validates before you upload it. Do so by using Validate a recipe (see the Jitterbit Command Line Interface). You should not upload recipes that do not validate, as they will have errors for users trying to configure the recipe.
-
Check logs for troubleshooting
After you have uploaded your recipe, you can also test it by configuring and deploying it via the Citizen Integrator interface. Don’t forget that all the same tools for debugging are available just as they are for any other Jitterbit project. See Citizen Integrator - My recipes or check out operation logs, project, activities, etc. within the Management Console.
Sample walkthrough
This section provides a walkthrough of creating a recipe for use with the Citizen Integrator web interface. This example uses some of the more common elements of recipes that you might normally encounter. For a full list of options you can include within recipes, see Recipe metadata definitions.
For this example, we will create a recipe that syncs accounts from Salesforce and upserts them to Zendesk. You can follow along with this demonstration by downloading the latest recipe for Salesforce to Zendesk following Get a specific recipe and Save the Jitterpak locally of the Jitterbit Command Line Interface.
Step 1: Create project in Design Studio
The first step is to set up your project in Design Studio. When creating your project, refer to the Jitterpak Best Practices above that are specific to creating Jitterpaks for use with recipes.
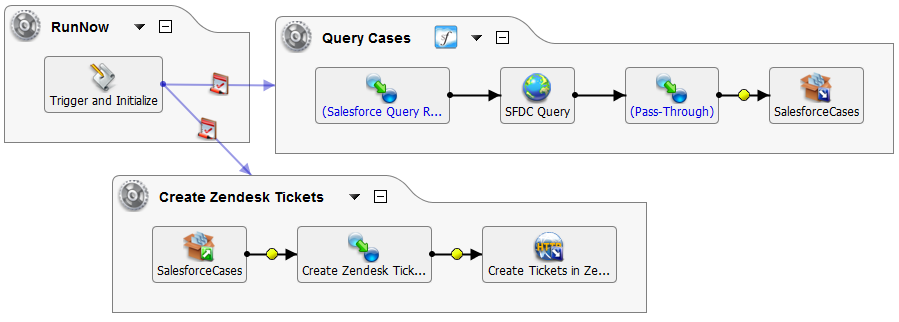
These components of the Jitterpak are used for the Salesforce to Zendesk recipe:
-
Operations: This Jitterpak is set up so that upon running the RunNow operation, Jitterbit will query Salesforce to get information about the cases (Query Cases), and then use those Salesforce cases to update and insert tickets in Zendesk (Create Zendesk Tickets). If you have downloaded the Jitterpak to follow along with, you can click on each element of the graph to learn more about the components of the operations.
-
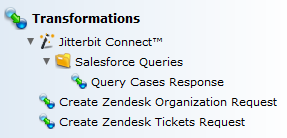
Transformations: Each transformation has been mapped so that the appropriate standard fields are included in the recipe. Many recipes will involve mapping standard fields from one endpoint to another. In this example, the Salesforce query uses only the appropriate fields for this specific recipe (i.e. Case Number, Origin, Subject, Supplied Email, Supplied Name). If you are creating your own recipe for use in an organization that uses Salesforce custom fields, you could also choose to integrate those into your recipe, as long as the mapping is defined here.
-
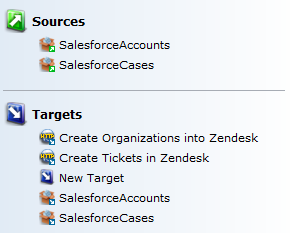
Sources & Targets: Define any sources and targets as you normally would for any Design Studio project. This particular recipe uses temporary storage for Salesforce Accounts and Salesforce Cases, and HTTP targets as the connection parameters for Zendesk.
-
Web Service Methods & Hosted HTTP Endpoints: This Jitterpak doesn’t use either of these components, but you can configure them just as you would for any other Design Studio project.
-
Schedules: This Jitterpak doesn’t include a schedule, but you can include one here if for example you want the operation to run daily. Since the schedule isn’t configurable by the user of the recipe, you should make sure to note within a text field of the recipe when your operation is scheduled to run. A typical place to add this is the Review step.
-
Email Messages: This Jitterpak doesn’t include any email messages, but you can choose to set these up using project variables if you want your recipe to generate email notifications.
-
Scripts: In this Jitterpak, scripts are used to write messages to the log, including specific success and failure messages.
-
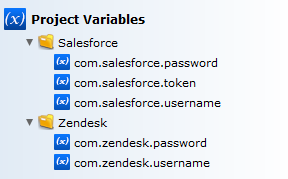
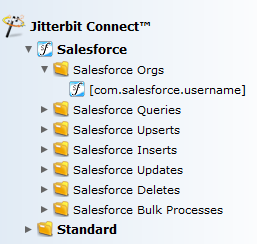
Project Variables: Project variables are key to creating configurable recipes. Typically, project variables are used wherever you want users to provide values during recipe configuration. In this Jitterpak, we have project variables for Salesforce and Zendesk credentials. Remember to test your Design Studio project with real values, then remove them prior to exporting the Jitterpak.
-
Jitterbit Connect: Since this Jitterpak uses Salesforce, the connection credentials for the organization are included in this section.
-
Connectors: This Jitterpak doesn’t use any connectors, but many other public recipes do. If you want to create a new recipe using a connector, it may be a good idea to download a different example using one of the connectors such as Autodesk.
Step 2: Test the Design Studio project
After your components are defined, save, deploy, and execute your Design Studio project to make sure it runs successfully.
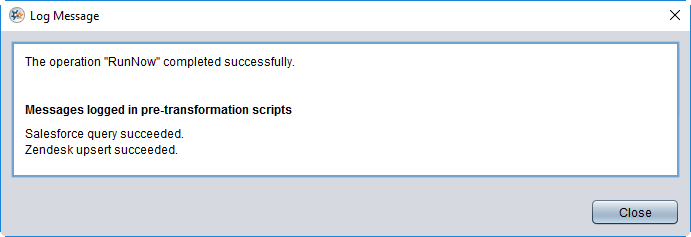
You can check the operation log for any error messages.
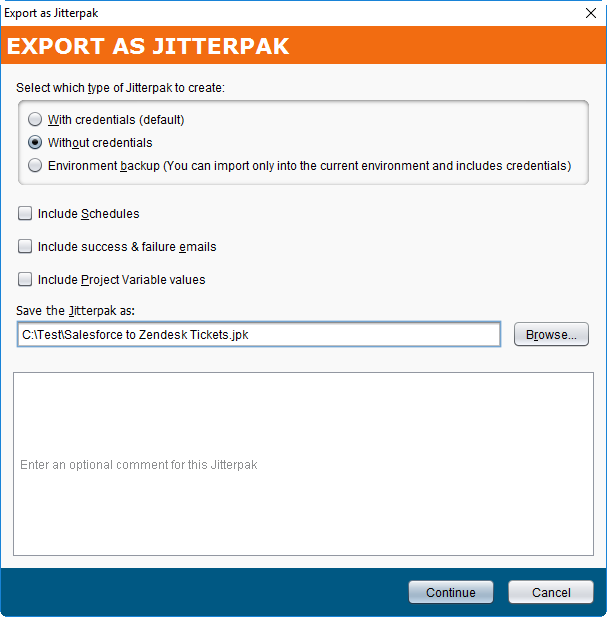
Step 3: Export the Design Studio project
Remove any project variable values or other credential information that you will be building into your recipe, and export your Design Studio project as a Jitterpak.
In this example, we remove project variables and credentials at the export stage. You can save in any location you wish for now, as you will upload the Jitterpak later (see Citizen Integrator - My Recipes or the Jitterbit Command Line Interface.
Step 4: Create recipe metadata
Now that you have a Jitterpak created, you can tailor your recipe metadata so that it matches with the components in your Jitterpak.
Refer to the Metadata best practices above for creating your recipe metadata file as well as the Step types when beginning a new recipe. For a full list of recipe definitions, see Recipe metadata definitions below for reference.
The full JSON file used to define the Salesforce to Zendesk recipe metadata is provided below, followed by a breakdown of each section of the recipe metadata file.
JSON Metadata - Salesforce to Zendesk
{
"description": "Sync accounts from Salesforce and upsert to Zendesk",
"name": "Salesforce to Zendesk",
"guid": "8yg7df8a-b526-4d14-a49d-39090d63a426",
"projectName": "Salesforce to Zendesk",
"steps": [
{
"name": "Introduction",
"description": "Sync accounts from Salesforce and upsert them to Zendesk",
"label": "Introduction",
"type": "org.jitterbit.integration.data.entity.Description",
"hidden": false,
"properties": [
{
"name": "template",
"defaultValue": "<div><p>This <b>Recipe</b> Syncs accounts from Salesforce and upserts them to Zendesk.</p></div>"
}
]
},
{
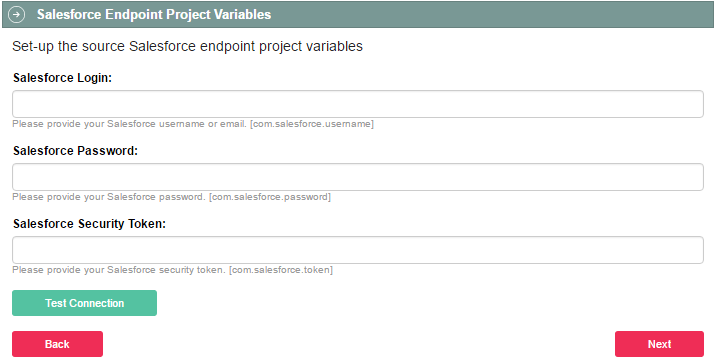
"name": "Salesforce Endpoint Project Variables",
"description": "Set-up the source Salesforce endpoint project variables",
"type": "org.jitterbit.integration.data.entity.ProjectVariable",
"hidden": false,
"properties": [],
"projectVariables": {
"names": [
"com.salesforce.username",
"com.salesforce.password",
"com.salesforce.token"
],
"action": {
"name": "test-endpoint-connection",
"displayName": "Test Connection",
"useStepAsRequest": "/Source/SalesforceEndpoint"
}
}
},
{
"name": "Test Salesforce Connection Information",
"description": "Test Salesforce endpoint connection information",
"label": "Source Endpoint (Salesforce)",
"type": "org.jitterbit.integration.data.entity.SalesforceConnector",
"hidden": true,
"path": "/Source/SalesforceEndpoint",
"properties": [
{
"name": "version",
"defaultValue": "37.0"
},
{
"name": "host",
"defaultValue": "https://login.salesforce.com"
},
{
"name": "username",
"defaultValue": "[com.salesforce.username]"
},
{
"name": "password",
"hidden": false,
"defaultValue": "[com.salesforce.password]"
},
{
"name": "token",
"hidden": false,
"defaultValue": "[com.salesforce.token]"
},
{
"name": "sandbox",
"defaultValue": "0"
}
]
},
{
"name": "Zendesk Endpoint Project Variables",
"description": "Set-up the target Zendesk endpoint project variables",
"type": "org.jitterbit.integration.data.entity.ProjectVariable",
"hidden": false,
"properties": [],
"projectVariables": {
"names": [
"com.zendesk.username",
"com.zendesk.password"
]
}
},
{
"name": "RunNow",
"description": "The Run Now operation runs the integration right now.",
"label": "RunNow",
"type": "org.jitterbit.integration.data.entity.RunOperation",
"hidden": false,
"path": "/Operations/RunNow",
"properties": [
{
"name": "operationName",
"defaultValue": "RunNow",
"description": "Run the recipe to get Salesforce accounts and upsert them to NetSuite right now."
}
]
},
{
"name": "Review",
"description": "Push this recipe to the cloud",
"label": "Review",
"type": "org.jitterbit.integration.data.entity.Description",
"hidden": false,
"properties": [
{
"name": "template",
"defaultValue": "<div><p>When you click <b>Save</b> this recipe will be ran daily at 3am indefinitely</p></div>"
}
]
}
],
"projectVariables": [
{
"name": "com.salesforce.username",
"displayName": "Salesforce Login",
"description": "Please provide your Salesforce username or email."
},
{
"name": "com.salesforce.password",
"displayName": "Salesforce Password",
"description": "Please provide your Salesforce password.",
"type": "password"
},
{
"name": "com.salesforce.token",
"displayName": "Salesforce Security Token",
"description": "Please provide your Salesforce security token.",
"type": "password"
},
{
"name": "com.zendesk.username",
"displayName": "Zendesk Login",
"description": "Please provide your Zendesk email."
},
{
"name": "com.zendesk.password",
"displayName": "Zendesk Password",
"description": "Please provide your Zendesk password.",
"type": "password"
}
],
}
-
description: Required
This field should contain a description of the recipe.
"description": "Sync accounts from Salesforce and upsert to Zendesk" -
guid: Required
This field can contain any value when the recipe is first uploaded; upon upload with an associated Jitterpak, the value will be replaced with the GUID (globally unique identifier) of the associated Jitterpak.
"guid": "8yg7df8a-b526-4d14-a49d-39090d63a426" -
name: Required
This field should contain the name of the recipe.
Shown as the title of the recipe in the Recipe List:"name": "Salesforce to Zendesk"
Shown as the title of the recipe under Configuration Steps:

-
projectName: Required
This field should match the name of the Jitterpak (JPK) file.
"projectName": "Salesforce to Zendesk" -
steps: Required
The steps define the Configuration Steps in the Citizen Integrator interface. The step attributes used in the Salesforce to Zendesk recipe are provided below, followed by a comparison of the Citizen Integrator interface and the JSON metadata for the step.
- name: Required This field is the name of the step.
- description: Required This field is a description of the step.
- label: This field is a label that can be used for rendering a step name that is different from the defined name of the step.
- type: Required This field is the type associated to this step. See Step types for an explanation of the various step types.
- required: This value can be set as true or false. If true, the recipe step will be required to be completed when the recipe is configured before the Test Connection or Run Operation actions can be used.
- hidden: This value can be set as true or false. If true, the step will be hidden in the Citizen Integrator interface. This can be useful if you have steps you do not want to show, such as for testing connection information. If false, the step will be shown. The default value is false, meaning steps are shown by default.
- path: Use if you are hiding steps and want to reference them in other steps. This value should be defined if you plan to embed a hidden step in another step. For example, if you want to include a Test Connection button within a step, you may hide the step for testing connection information, then refer to it in another step. The way we refer to it is defining a path.
- properties: Can be used only if projectVariables are not used. These include properties associated to the step. In a step, you can have either properties or projectVariables assigned, but not both at the same time.
- name: Required This field is the name of the property being defined for this step.
- defaultValue: This field can contain a default value associated to the property. Typically this is used to insert instructional or informational text into a step.
- description: This field can contain default text that will appear within the text box.
- projectVariables: Can be used only if properties are not used. These include a list of project variables grouped together that represent configurable entities. In a step, you can have either projectVariables or properties assigned, but not both at the same time.
- names: Required This field contains a list of all project variables being used in this step.
- action: This field defines any actions. Typically these are used as buttons within a step to perform actions that may be defined as hidden steps.
- name: Required This field is the name of the action.
- displayName: This field can be used if you want a different name to display in the Citizen Integrator interface.
- useStepAsRequest: Required This field is used to provide the path to properties defined in another step that is not rendered. Use the same value that you defined for “path” in the hidden step.
Step 1: Introduction

JSON Metadata for Step 1
{
  "name": "Introduction",
  "description": "Sync accounts from Salesforce and upsert them to Zendesk",
  "label": "Introduction",
  "type": "org.jitterbit.integration.data.entity.Description",
  "hidden": false,
  "properties": [
    {
      "name": "template",
      "defaultValue": "<div><p>This <b>Recipe</b> Syncs accounts from Salesforce and upserts them to Zendesk.</p></div>"
    }
  ]
},
Step 2: Salesforce Endpoint Project Variables
JSON Metadata for Step 2
{
  "name": "Salesforce Endpoint Project Variables",
  "description": "Set-up the source Salesforce endpoint project variables",
  "type": "org.jitterbit.integration.data.entity.ProjectVariable",
  "hidden": false,
  "properties": [],
  "projectVariables": {
    "names": [
      "com.salesforce.username",
      "com.salesforce.password",
      "com.salesforce.token"
    ],
    "action": {
      "name": "test-endpoint-connection",
      "displayName": "Test Connection",
      "useStepAsRequest": "/Source/SalesforceEndpoint"
    }
  }
},
Hidden Step: Test Salesforce Connection Information
JSON Metadata for Hidden Step
{
  "name": "Test Salesforce Connection Information",
  "description": "Test Salesforce endpoint connection information",
  "label": "Source Endpoint (Salesforce)",
  "type": "org.jitterbit.integration.data.entity.SalesforceConnector",
  "hidden": true,
  "path": "/Source/SalesforceEndpoint",
  "properties": [
    {
      "name": "version",
      "defaultValue": "37.0"
    },
    {
      "name": "host",
      "defaultValue": "https://login.salesforce.com"
    },
    {
      "name": "username",
      "defaultValue": "[com.salesforce.username]"
    },
    {
      "name": "password",
      "hidden": false,
      "defaultValue": "[com.salesforce.password]"
    },
    {
      "name": "token",
      "hidden": false,
      "defaultValue": "[com.salesforce.token]"
    },
    {
      "name": "sandbox",
      "defaultValue": "0"
    }
  ]
},
Step 3: Zendesk Endpoint Project Variables
JSON Metadata for Step 3
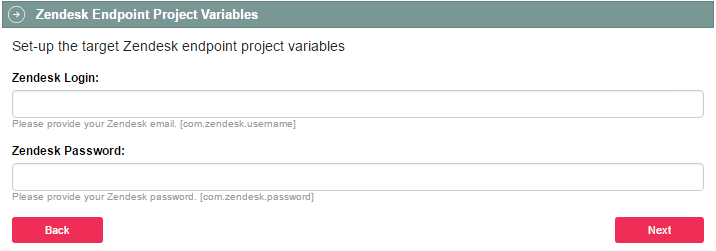
{
  "name": "Zendesk Endpoint Project Variables",
  "description": "Set-up the target Zendesk endpoint project variables",
  "type": "org.jitterbit.integration.data.entity.ProjectVariable",
  "hidden": false,
  "properties": [],
  "projectVariables": {
    "names": [
      "com.zendesk.username",
      "com.zendesk.password"
    ]
  }
},
Step 4: RunNow
JSON Metadata for Step 4
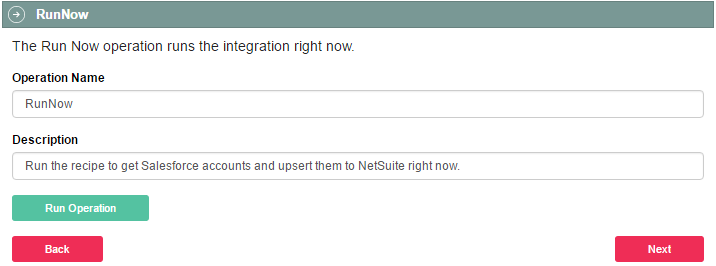
{
  "name": "RunNow",
  "description": "The Run Now operation runs the integration right now.",
  "label": "RunNow",
  "type": "org.jitterbit.integration.data.entity.RunOperation",
  "hidden": false,
  "path": "/Operations/RunNow",
  "properties": [
    {
      "name": "operationName",
      "defaultValue": "RunNow",
      "description": "Run the recipe to get Salesforce accounts and upsert them to NetSuite right now."
    }
  ]
},
Step 5: Review

JSON Metadata for Step 5
{ "name": "Review", "description": "Push this recipe to the cloud", "label": "Review", "type": "org.jitterbit.integration.data.entity.Description", "hidden": false, "properties": [ { "name": "template", "defaultValue": "<div><p>When you click <b>Save</b> this recipe will be ran daily at 3am indefinitely</p></div>" } ] } -
projectVariables: This section defines any project variables used in the recipe steps. Note that this is a new section of the recipe metadata file that comes at the end after the steps, and is not to be confused with the projectVariables used within the steps themselves.
- name: Required This field contains the name of the project variable as used in your Jitterpak.
- displayName: This field can be used if you want a different name to display in the Citizen Integrator interface.
- description: This field can be used to insert text below the field, for example to provide instruction on what users should enter.
- type: This field can be used to define the type of value that the user can provide. The default value is string. You can also use integer, float, double, date, time, boolean, password, enum, dropdown, checkboxes, or textarea.
- required: This value can be set as true or false. If true, the project variable field will be required to be completed when the recipe is configured before the Test Connection or Run Operation actions can be used.
- regex: This field can be used to provide a regular expression (string) that the project variable value must match when the recipe is configured before the Test Connection or Run Operation actions can be used. For example:
.+@.+[.].+. - value: This field can be used if you want to assign a default value to your project variable. This can be used to provide a default value with other optional values for the project variable. An additional example of JSON metadata using values and options is provided in Example 2 below.
- options: This field can be used to present possible values in a dropdown menu, text area, or checkboxes. An additional example of JSON metadata using values and options is provided in Example 2 below.
JSON Metadata Example 1
"projectVariables": [
  {
    "name": "com.salesforce.username",
    "displayName": "Salesforce Login",
    "description": "Please provide your Salesforce username or email."
  },
  {
    "name": "com.salesforce.password",
    "displayName": "Salesforce Password",
    "description": "Please provide your Salesforce password.",
    "type": "password"
  },
  {
    "name": "com.salesforce.token",
    "displayName": "Salesforce Security Token",
    "description": "Please provide your Salesforce security token.",
    "type": "password"
  },
  {
    "name": "com.zendesk.username",
    "displayName": "Zendesk Login",
    "description": "Please provide your Zendesk email."
  },
  {
    "name": "com.zendesk.password",
    "displayName": "Zendesk Password",
    "description": "Please provide your Zendesk password.",
    "type": "password"
  }
]
JSON Metadata Example 2
"projectVariables": [
  {
    "name": "myDropdown",
    "displayName": "Dropdown Test",
    "value": "ProdOperation",
    "type": "dropdown",
    "description": "A field to test the dropdown feature",
    "options": [
      {
        "name": "Development",
        "value": "DevOperation"
      },
      {
        "name": "Production",
        "value": "ProdOperation"
      }
    ]
  },
  {
    "name": "myCheckboxes",
    "displayName": "Checkbox Test",
    "value": "ProdOperation",
    "type": "checkboxes",
    "description": "A field to test the checkbox feature",
    "options": [
      {
        "name": "Development",
        "value": "DevOperation"
      },
      {
        "name": "Production",
        "value": "ProdOperation"
      }
    ]
  },
  {
    "name": "myTextarea",
    "displayName": "Comments",
    "type": "textarea",
    "value": "This is a comment for the textarea",
    "description": "SAP Language"
  }
]
Step types
Each step within the Citizen Integrator recipe metadata has a “type” attribute that indicates the step’s type. These steps correspond directly with those users will see using the Citizen Integrator interface, and the types of those steps correspond directly with Design Studio.
These are the possible step types available. Additional information on each step type is provided in the following sections.
org.jitterbit.integration.data.entity.Descriptionorg.jitterbit.integration.data.entity.ProjectVariableorg.jitterbit.integration.data.entity.RunOperationorg.jitterbit.integration.data.entity.SalesforceConnectororg.jitterbit.integration.data.entity.GenericPropertiesorg.jitterbit.integration.data.entity.Scheduleorg.jitterbit.integration.data.entity.ApiBindingorg.jitterbit.integration.data.entity.HttpFormorg.jitterbit.integration.data.entity.TemporaryStorageorg.jitterbit.integration.data.entity.FileShareorg.jitterbit.integration.data.connector.FTPEndpointorg.jitterbit.integration.data.connector.DBEndpointorg.jitterbit.integration.data.connector.AutoDeskEndpointorg.jitterbit.integration.data.connector.NetSuiteEndpointorg.jitterbit.integration.data.connector.SapEndpointorg.jitterbit.integration.data.connector.JMSEndpointorg.jitterbit.integration.data.connector.MSAXEndpointorg.jitterbit.integration.data.connector.Four51Endpointorg.jitterbit.integration.data.connector.ClarizenEndpointorg.jitterbit.integration.data.connector.QuickBooksEndpoint
Description
org.jitterbit.integration.data.entity.Description
This step type should be used when there is a need to provide detailed information about a recipe or a step, or can be used as a Review at the end of the recipe.
-
For example:
{ "name": "Introduction", "description": "Insert accounts into a postgres database", "label": "Introduction", "type": "org.jitterbit.integration.data.entity.Description", "properties": [ { "name": "template", "defaultValue": "<div>...</div>" } -
If this step is the last step within a recipe (defined as a Review step) and it contains the “submitOperationsToRun” property, then the Save & Finish button will apply this logic regarding the operations that needs to be submit for run. Note that if these options are not set, the Save & Finish button will not submit operations to run.
-
No operations will be submitted for run if:
{ "name": "submitOperationsToRun", "value": "" } -
Only the specified operations will be submitted for run if:
{ "name": "submitOperationsToRun", "value": "Operation1;Operation2" } -
All operations will be submitted for run if the property is not present:
{
"name": "submitOperationsToRun",
"value": "*"
}
-
ProjectVariable
org.jitterbit.integration.data.entity.ProjectVariable
This step type is used to group a set of project variables together. It can also be used to redefine an endpoint definition. An optional “action” can be attached to it.
-
For example:
{ "name": "Ftp Endpoint", "description": "Set-up the Source FTP Endpoint project variables", "type": "org.jitterbit.integration.data.entity.ProjectVariable", "projectVariables": { "names": [ "acme.org.ftp.host", "acme.org.ftp.username", "acme.org.ftp.password", "acme.org.ftp.path", "acme.org.ftp.filename" ], "action": { "name": "test-endpoint-connection", "displayName": "Test Connection", "useStepAsRequest": "/Source/FtpSite" } } } -
These “actions” are supported:
- “test-endpoint-connection”: This is used for testing an endpoint connection. It must be used along with an endpoint.
- “submit-http-form”: This needs to be used along with an HTTP form (see below).
RunOperation
org.jitterbit.integration.data.entity.RunOperation
This step type is used to run an operation in order to allow the user to test.
-
For example:
   {
    "name": "Run Now",
    "description": "Run Now operation - fetch the csv file, parse and insert into database",
    "label": "Run Now",
    "type": "org.jitterbit.integration.data.entity.RunOperation",
    "path": "/Operation/SyncAccounts",
    "properties": [
      {
        "name": "operationName",
        "defaultValue": "SyncAccounts",
        "description": "Synchronize Accounts"
      }
    ]
  }
ApiBinding
org.jitterbit.integration.data.entity.ApiBinding
This step type is used when there is a need to externalize operations as APIs.
-
“assignTo”: This allows you to store the URI to a project variable that can be used within the Jitterpak. For example:
{
    "name": "Review the WebHooks associated to this recipe",
    "description": "The following Web API will be registered as webhooks to your system",
    "type": "org.jitterbit.integration.data.entity.ApiBinding",
    "bindings": {
      "apis": [
        {
          "apiName": "FetchAccounts",
          "publicName": "citizen-fetchaccounts",
          "version": "v1",
          "sslOnly": "True",
          "timeout": "30",
          "enableCORS": "False",
          "assignTo": "acme.com.myservice.fetchaccounts.uri",
          "methods": [
            {
              "method": "GET",
              "operationName": "RunNow",
              "responseType": "FINAL_TARGET" // possible - values "NO_RESPONSE", "FINAL_TARGET", "VARIABLE"
            }
          ]
        }
      ],
      "action": {
        "name": "import-api-packs",
        "displayName": "Bind API(s)",
        "useStepAsRequest": ""
      }
    }
  }
HttpForm
org.jitterbit.integration.data.entity.HttpForm
This step type is used when there is a need to interact with an HTTP Endpoint. Project variables can be used as inputs for request/headers.
-
For example:
  {
    "name": "ConstantContact Endpoint Project Variables",
    "description": "Set up the target Constant Contact endpoint project variable. Enter one of com.constantcontact.listid or com.constantcontact.listname.",
    "type": "org.jitterbit.integration.data.entity.ProjectVariable",
    "projectVariables": {
      "names": [
        "com.constantcontact.apikey",
        "com.constantcontact.accesstoken",
        "com.constantcontact.listid",
        "com.constantcontact.listname"
      ],
      "action": {
        "name": "submit-http-form",
        "displayName": "Test Connection",
        "useStepAsRequest": "/Target/ConstantContactEndpoint"
      }
    }
   },
   ...
   {
    "name": "Test ConstantContact Connection Information",
    "description": "Test ConstantContact endpoint connection information",
    "label": "Target Endpoint (ConstantContact)",
    "type": "org.jitterbit.integration.data.entity.HttpForm",
    "hidden": true,
    "path": "/Target/ConstantContactEndpoint",
    "properties": [
      { "name": "verb", "defaultValue": "GET" },
      { "name": "url", "defaultValue": "https://api.constantcontact.com/v2/lists?api_key=[com.constantcontact.apikey]" },
      { "name": "headers", "defaultValue": "Authorization: Bearer [com.constantcontact.accesstoken]" },
      { "name": "httpRequest", "defaultValue": "" },
      { "name": "httpResponse", "defaultValue": "" }
    ]
   }
Connector
org.jitterbit.integration.data.connector.*
These are used for the respective endpoints listed:
org.jitterbit.integration.data.connector.FTPEndpointorg.jitterbit.integration.data.connector.DBEndpointorg.jitterbit.integration.data.connector.AutoDeskEndpointorg.jitterbit.integration.data.connector.NetSuiteEndpointorg.jitterbit.integration.data.connector.SapEndpointorg.jitterbit.integration.data.connector.JMSEndpointorg.jitterbit.integration.data.connector.MSAXEndpointorg.jitterbit.integration.data.connector.Four51Endpointorg.jitterbit.integration.data.connector.ClarizenEndpointorg.jitterbit.integration.data.connector.QuickBooksEndpoint
Recipe metadata definitions
These subsections cover the full metadata definitions for recipes are they are defined within Jitterbit. These sections describe all possible parts of the JSON metadata file. Any required fields are listed at the end of each section.
- Recipe
- Step
- Action
- API
- API Method
- Property
- Deploy Jitterpak Details
- Operation
- Deploy Response
- Recipe Integration
- Tag
- Author
- Environment
- Agent
- Agent Group
- Login Response
- Organization
- Organization Detail
- Endpoint Connection Information
- HTTP Connection Parameters
- Key Value
- Error
- Operation Log
- Operation Log Record
- Operation Log Details
- Message and Field Name
- Result File Category and GUID
- Run Operation Response
- Record
- User Information
- Deployed Status
- Endpoint Information
- AWS Error
Recipe
  Recipe:
    type: object
    properties:
      id:
        type: string
        description: "The numerical ID of the recipe"
      guid:
        type: string
        description: "Unique identifier representing a recipe"
      author:
        See separate definition for Author
      orgId:
         type: string
         description: "The Organization ID"
      description:
        type: string
        description: "Description of Recipe"
      name:
        type: string
        description: "Name of Recipe"
      projectName:
        type: string
        description: "Name of the Jitterbit Project (or Jitterpak)"
      displayName:
        type: string
        description: "Display name of Recipe"
      summary:
        type: string
        description: "Short description of Recipe"
      tags:
        type: array
        items:
          See separate definition for Tag
        description: List of tags
      steps:
        type: array
        items:
          See separate definition for Step
      projectVariables:
         type: array
         items:
           See separate definition for property
      createdAt:
         type: number
         description: "Number of milliseconds since the UNIX epoch (Jan 1 1970 12am UTC)"
      updatedAt:
         type: number
         description: "Number of milliseconds since the UNIX epoch (Jan 1 1970 12am UTC)"
      updatedBy:
         See separate definition for Author
      version:
         type: string
         description: "Version of the recipe. Incremented when updated."
    required:
      - guid
      - description
      - name
      - projectName
      - steps
Step
  Step:
    properties:
      name:
       type: string
       description: "Name of step"
      description:
        type: string
        description: "Description of the step"
      guid:
        type: string
        description: "A unique id associated to the step"
      label:
        type: string
        description: "A label that can be used for rendering instead of the name property"
      type:
        type: string
        enum:
         - org.jitterbit.integration.data.entity.Description
         - org.jitterbit.integration.data.entity.ProjectVariable
         - org.jitterbit.integration.data.entity.RunOperation
         - org.jitterbit.integration.data.connector.FTPEndpoint
         - org.jitterbit.integration.data.connector.DBEndpoint
         - org.jitterbit.integration.data.connector.AutoDeskEndpoint
         - org.jitterbit.integration.data.connector.NetSuiteEndpoint
         - org.jitterbit.integration.data.connector.SapEndpoint
         - org.jitterbit.integration.data.connector.JMSEndpoint
         - org.jitterbit.integration.data.entity.SalesforceConnector
         - org.jitterbit.integration.data.entity.GenericProperties
         - org.jitterbit.integration.data.entity.Schedule
         - org.jitterbit.integration.data.entity.ApiBinding
         - org.jitterbit.integration.data.entity.HttpForm
         - org.jitterbit.integration.data.entity.TemporaryStorage
         - org.jitterbit.integration.data.entity.FileShare
         - org.jitterbit.integration.data.connector.MSAXEndpoint
         - org.jitterbit.integration.data.connector.QuickBooksEndpoint
         - org.jitterbit.integration.data.connector.ClarizenEndpoint
         - org.jitterbit.integration.data.connector.Four51Endpoint
        description: |
           "Type associated with this step; these are possible values:
                    org.jitterbit.integration.data.entity.Description
                    org.jitterbit.integration.data.entity.ProjectVariable,
                    org.jitterbit.integration.data.entity.RunOperation,
                    org.jitterbit.integration.data.connector.FTPEndpoint,
                    org.jitterbit.integration.data.connector.DBEndpoint,
                    org.jitterbit.integration.data.connector.AutoDeskEndpoint,
                    org.jitterbit.integration.data.connector.NetSuiteEndpoint,
                    org.jitterbit.integration.data.connector.SapEndpoint,
                    org.jitterbit.integration.data.connector.JMSEndpoint,
                    org.jitterbit.integration.data.entity.SalesforceConnector,
                    org.jitterbit.integration.data.entity.GenericProperties,
                    org.jitterbit.integration.data.entity.ApiBinding,
                    org.jitterbit.integration.data.entity.Schedule,
                    org.jitterbit.integration.data.entity.HttpForm,
                    org.jitterbit.integration.data.entity.FileShare,
                    org.jitterbit.integration.data.entity.TemporaryStorage,
                    org.jitterbit.integration.data.connector.MSAXEndpoint,
                    org.jitterbit.integration.data.connector.QuickBooksEndpoint,
                    org.jitterbit.integration.data.connector.ClarizenEndpoint,
                    org.jitterbit.integration.data.connector.Four51Endpoint"
      hidden:
        type: boolean
        description: "Indicate if this step should be renderable or not"
      required:
        type: boolean
        description: "Whether the step requires validation or not"
      properties:
        type: array
        description: "Properties associated with this step; in a step you can have either properties or projectVariables but not both at the same time"
        items:
          See separate definition for property
      path:
        type: string
        description: "If this step maps to an entry in Jitterpak provide the path to; in general, this is valid for endpoints"
      projectVariables:
        type: object
        description: "A list of project variables grouped together to represent a configurable entities; this cannot be used if properties are defined"
        properties:
          names:
            type: array
            items:
             type: string
          action:
            See separate definition for Action
            description: "Describe an action that can be invoked using properties from specified step; example: test connection endpoint"
        required:
          - names
      bindings:
        type: object
        properties:
          apis:
            type: array
            items:
              See separate definition for API
          action:
            See separate definition for Action
    required:
      - name
      - description
      - type
Action
  Action:
    properties:
      name:
        type: string
      displayName:
        type: string
      useStepAsRequest:
        type: string
        description: "Use properties from a specified steps within the recipe; usually such a step is defined as a hidden step that is not rendered"
    required:
      - name
      - useStepAsRequest
API
  API:
    properties:
      apiName:
        type: string
        description: "Name of the API"
      publicName:
        type: string
        description: "The public name of the API; this name would be part of the URI that will be public"
      description:
        type: string
        description: "A short description of the api"
      version:
        type: string
        description: "Version of the API"
      sslOnly:
        type: boolean
        description: "Indicate if should only listen over HTTPS only - defaults to true"
      timeout:
        type: number
        description: "Indicate after how many seconds to timeout; default is 30s"
      enableCORS:
        type: boolean
        description: "Indicate if the cors should be enabled or not; defaults to false"
      assignTo:
        type: string
        description: "Assign the API URL to a project variable defined within the associated JPK"
      methods:
        type: array
        items:
          See separate definition for API Method
    required:
      - apiName
      - publicName
      - description
      - version
      - methods
API method
  APIMethod:
    properties:
      method:
        type: string
        description: "Indicate the HTTP verb for to use for this APIMethod (PUT|POST|DELETE|GET)"
        enum:
          - GET
          - DELETE
          - POST
          - PUT
      operationName:
        type: string
        description: "Name of operation that will be invoked when this APIMethod is invoked"
      responseType:
        type: string
        description: "Response type returned by the operation; defaults to NO_RESPONSE"
        enum:
          - VARIABLE
          - FINAL_TARGET
          - NO_RESPONSE
    required:
      - method
      - operationName
Property
  Property:
    properties:
      name:
        type: string
        description: "Property name"
      defaultValue:
        type: string
        description: "Default value associated to this property"
      value:
        type: string
        description: "A value assigned by the user; if no value is provided by default the defaultValue will be assigned"
      type:
        type: string
        description: "Indicate the type of the value; integer, float, double, date, time, boolean, string, password, textarea, enum; default string"
      description:
        type: string
        description: "Provide a description of this property"
      hidden:
        type: boolean
        description: "Default value will be false"
      displayName:
        type: string
        description: "Name used for displaying; if not defined then the name property will be used"
      required:
        type: boolean
        description: "Whether the property requires a value or not"
      regex:
        type: boolean
        description: "Regex that the value should match"
    required:
      - name
Deploy Jitterpak details
  DeployJpkDetails:
    type: object
    properties:
      envId:
        type: string
        description: "Environment ID of the deployed recipe."
      envName:
        type: string
        description: "Environment name"
      projectId:
        type: string
        description: "Deployed recipe ID"
      projectGuid:
        type: string
        description: "Deployed project GUID"
      projectName:
        type: string
        description: "Deployed project name"
      oldProjectVariables:
        type: array
        items:
          See separate definition for property
Operation
  Operation:
    type: object
    properties:
      operationGuid:
        type: string
        description: "The GUID of the operation"
      operationName:
        type: string
        description: "The name of the operation"
Deploy response
  DeployResponse:
    properties:
      deployJpkDetails:
        type: array
        items:
          See separate definition for Deploy JPK Details
      operations:
        type: array
        items:
          See separate definition for Operation
Recipe integration
  RecipeIntegration:
    allOf:
      - See separate definition for Recipe
      - properties:
         deployedRecipeId:
           description: "ID of the deployed configured recipe (this is the same as the ID of a Jitterbit project that is deployed to an environment)"
           type: string
Tag
  Tag:
    type: object
    properties:
      key:
        type: string
        description: "A key that can be used for searching the recipe later; possible values: source, target, search"
      value:
        type: string
        description: "A value that can be in a search to match a recipe"
    required:
      - key
      - value
Author
  Author:
    type: object
    properties:
      userId:
         type: string
         description: "ID of the recipe's author"
      name:
          type: string
          description: "Name of the recipe's author"
      orgName:
          type: string
          description: "Name of the organization that this user is part of"
    required:
      - userId
      - name
Environment
  Environment:
    type: object
    properties:
      id:
        type: string
        description: "A unique ID associated to environment"
      orgId:
        type: string
        description: "The ID of the org that this environment is part of"
      name:
        type: string
        description: "Name of the environment"
      agentGroupName:
        type: string
        description: "The agent group associated with this environment"
      agentGroupId:
        type: string
        description: "The ID of the agent group"
      urlPrefix:
         type: string
         description: "Prefix URL associated to environment"
Agent
  Agent:
    type: object
    properties:
      id:
        type: string
        description: "Unique ID of the agent"
      name:
        type: string
        description: "Name of the agent"
      os:
        type: string
        description: "Type of operating system where agent is running"
      osVersion:
        type: string
        description: "Type of operating system where agent is running"
      jitterbitVersion:
        type: string
        description: "Version of the Jitterbit Agent"
      hostname:
        type: string
        description: "Name of the host"
      ipv4Address:
        type: string
        description: "IPV4 Address"
      ipv6Address:
        type: string
        description: "IPV6 Address"
      agentGroupName:
        type: string
        description: "Associate the agent with the named agent group"
      status:
        type: string
        description: "Indicates if the agent is running"
      agentGroupId:
        type: string
        description: "Id of the agent group that this agent is part of"
Agent group
  AgentGroup:
    type: object
    properties:
      id:
        type: string
        description: "ID of the agent group"
      name:
        type: string
        description: "Name of the agent group"
      description:
        type: string
        description: "Description of the agent group"
Login response
  LoginResponse:
    type: object
    properties:
      authenticationToken:
        type: string
        description: "Token that is used for authentication/authorizing client's REST requests"
      status:
        type: boolean
        description: "Indicate if the user is active or not"
      defaultOrgId:
        type: string
        description: "Default organization id that the user has logged into"
      orgs:
        type: array
        description: "Organizations that the user is part of"
        items:
          See separate definition for Organization
Organization
  Org:
     type: object
     properties:
       orgId:
         type: string
         description: "ID of the organization"
       orgName:
         type: string
         description: "Name of the organization"
       orgZoneUrl:
         type: string
         description: "Zone URL associated to this organization"
       urlPrefix:
         type: string
         description: "The URL prefix used for the API gateway for this organization"
       apiHost:
         type: string
         description: "The DNS hostname used by this organization when exposing APIs"
Organization detail
  OrgDetail:
    allOf:
      - See separate definition for Recipe
      - properties:
          orgType:
            description: "Type of org"
            type: number
          active:
            description: "Indicate if this org is active or not"
            type: boolean
          legalName:
            description: "The legal name of the org"
            type: string
          environments:
            type: array
            items:
              See separate definition for Environment
Endpoint connection information
  EndpointConnectionInfo:
    type: object
    description: "Object that defines the properties associated to a connection endpoint"
    properties:
      keyValues:
        type: array
        items:
          See separate definition for KeyValue
HTTP connection parameters
  HttpConnectionParams:
    type: object
    properties:
      verb:
        type: array
        items:
          See separate definition for property
      url:
        type: array
        items:
          See separate definition for property
      headers:
        type: array
        items:
          See separate definition for property
      httpRequest:
        type: array
        items:
          See separate definition for property
      httpResponse:
        type: array
        items:
          See separate definition for property
      username:
        type: array
        items:
          See separate definition for property
      password:
        type: array
        items:
          See separate definition for property
      errorIfRegexMatch:
        type: array
        items:
          See separate definition for property
      errorMessageRegexSearch:
        type: array
        items:
          See separate definition for property
Key value
  KeyValue:
    type: object
    properties:
      key:
       type: string
      value:
       type: string
Error
  Error:
    type: object
    properties:
      code:
        type: integer
        description: "Code associated with this error; in general, maps to an HTTP Code"
      message:
        type: string
        description: "A description of the error"
      fields:
        type: string
        description: "Fields that report the error (optional)"
Operation log
  OperationLog:
    type: object
    properties:
      records:
        type: array
        items:
          See separate definition for Operation Log Record
Operation log record
  OperationLogRecord:
    type: object
    properties:
      attributes:
        See separate definition for Record
      childRecords:
        See separate definition for Operation Log
Operation log details
  OperationLogDetails:
    type: object
    properties:
      operationName:
        type: string
      mainMessage:
        type: string
      sourceRecords:
        type: integer
        description: Number of source records
      targetRecords:
        type: integer
        description: Number of target records
      failedRecords:
        type: integer
        description: Number of failed records
      successRecords:
        type: integer
        description: Number of success records
      filesProcessed:
        type: integer
        description: Number of files processed
      messageAndFieldName:
        type: array
        items:
          See separate definition for Message and Field Name
      resultFileCategoryAndGuid:
        type: array
        items:
          See separate definition for Result File Category and GUID
Message and field name
  MessageAndFieldName:
    type: object
    properties:
      message:
        type: string
      fieldName:
        type: string
Result file category and GUID
  ResultFileCategoryAndGuid:
    type: object
    properties:
      category:
        type: number
      fileGuid:
        type: number
Run operation response
  RunOperationResponse:
    type: object
    properties:
      orgId:
        type: string
        description: "ID of the organization associated with the environment where the operation has been deployed and executed"
      environmentId:
        type: string
        description: "ID of the environment where the operation has been deployed and executed"
      operationInstanceGuid:
        type: string
        description: "GUID of the operation instance"
      operationGuid:
        type: string
        description: "GUID of the operation"
      submittedAt:
        type: string
        description: "Date when the operation was submitted for execution"
Record
  Record:
    type: object
    properties:
      operationInstanceGuid:
        type: string
        description: "GUID of an instance of an operation; represents an execution of an operation"
      parentInstanceGuid:
        type: string
        description: "GUID associated to the parent operation; an operation that has been triggered/executed this operation instance"
      operationGuid:
        type: string
        description: "GUID associated to this operation"
      operationName:
        type: string
        description: "Name of the operation"
      operationStatusId:
        type: number
        description: "Possible value for the operation statusId: SUBMITTED(0), PENDING(1), CANCELED(2), RUNNING(3), SUCCESS(4), SUCCESS_WITH_INFO(5), SUCCESS_WITH_WARNING(6), ERROR(7), CANCEL_REQUESTED(8), SUCCESS_WITH_CHILD_ERROR(9), RECEIVED(10), UNKNOWN(-1)"
      operationStatus:
        type: string
        description: "Status of the operation - see operationStatusId for possible values"
      environmentId:
        type: string
        description: "ID of the  environment where operation has been deployed and running"
      environmentName:
        type: string
        description: "Name of the environment where operation has been deployed and running"
      agentId:
        type: string
        description: "ID of the agent where operation has been running"
      agentName:
        type: string
        description: "Name of the agent where operation has been running"
      projectName:
        type: string
        description: "Name of the Jitterbit pack associated to the recipe"
      message:
        type: string
        description: "The message associated with this operation indicating the status of it"
      operationEnteredTimestamp:
        type: number
        description: "Timestamp when the operation was entered"
      operationStartedTimestamp:
        type: number
        description: "Timestamp when the operation was started"
      operationStatusTimestamp:
        type: number
        description: "Timestamp of the operation status"
      debugModeEnabled:
        type: boolean
        description: "Indicate if the debug mode is enabled or not"
      debugFilePresent:
        type: boolean
        description: "Indicate if there is a debug file present for downloading"
User information
  UserInfo:
    type: object
    properties:
      title:
        type: string
      phone:
       type: string
      company:
        type: string
      postalCode:
        type: string
      subscription:
        type: string
      signUpSource:
        type: string
      offeringEnumId:
        type: string
      active:
        type: string
      timezone:
        type: string
Deployed status
  DeployedStatus:
    type: object
    properties:
      good:
        type: integer
      warn:
        type: integer
      error:
        type: integer
Endpoint information
  EndpointInfo:
    type: object
    properties:
      name:
        type: string
        description: "Name of the endpoint"
      category:
        type: string
        description: "Indicates the category this endpoint is part of; examples: crm, database"
      icon:
        type: string
        description: "Path to fetch the icon associated with this endpoint"
    required:
      - name
      - icon
AWS error
  AWSError:
    type: object
    properties:
      code:
        type: string
      message:
        type: string
      retryable:
        type: boolean
      statusCode:
        type: number
      hostname:
        type: string
      region:
        type: string
      retryDelay:
        type: number
      requestId:
        type: string
      extendedRequestId:
        type: string
      cfId:
        type: string